Application Documentation
User-focused guides and step-by-step workflows to help you get started quickly and confidently.
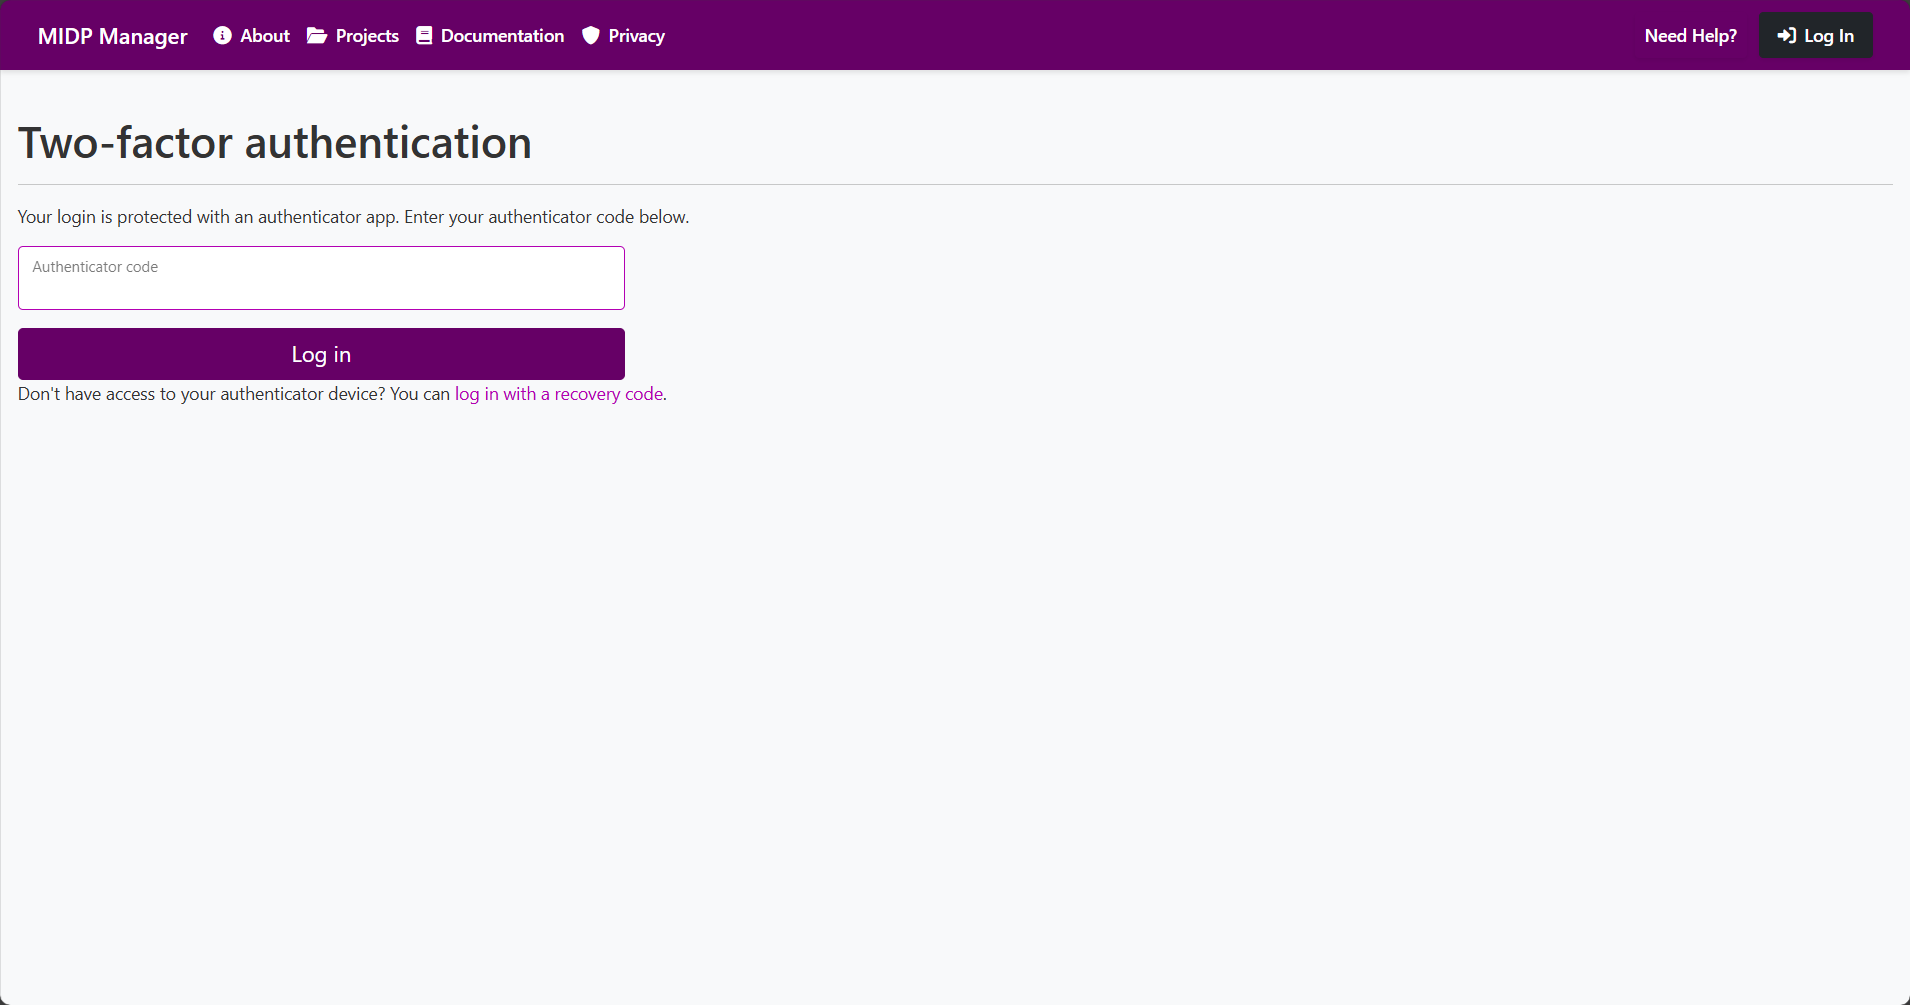
Brief: Authenticate to access your projects and workspace.
Pre-requisites
- An existing account (email + password) or configured corporate SSO.
Sign-in options
Email and password External
Use your registered email address and password to sign in. Default for non-Jacobs users.
Jacobs SSO SSO
Click Sign in with Jacobs to use corporate single-sign-on; you will be redirected to Jacobs authentication and returned after success.
Step-by-step (Email + Password)
- Click Sign in from the home page.
- Enter your email address and password.
- Click the Sign in button.
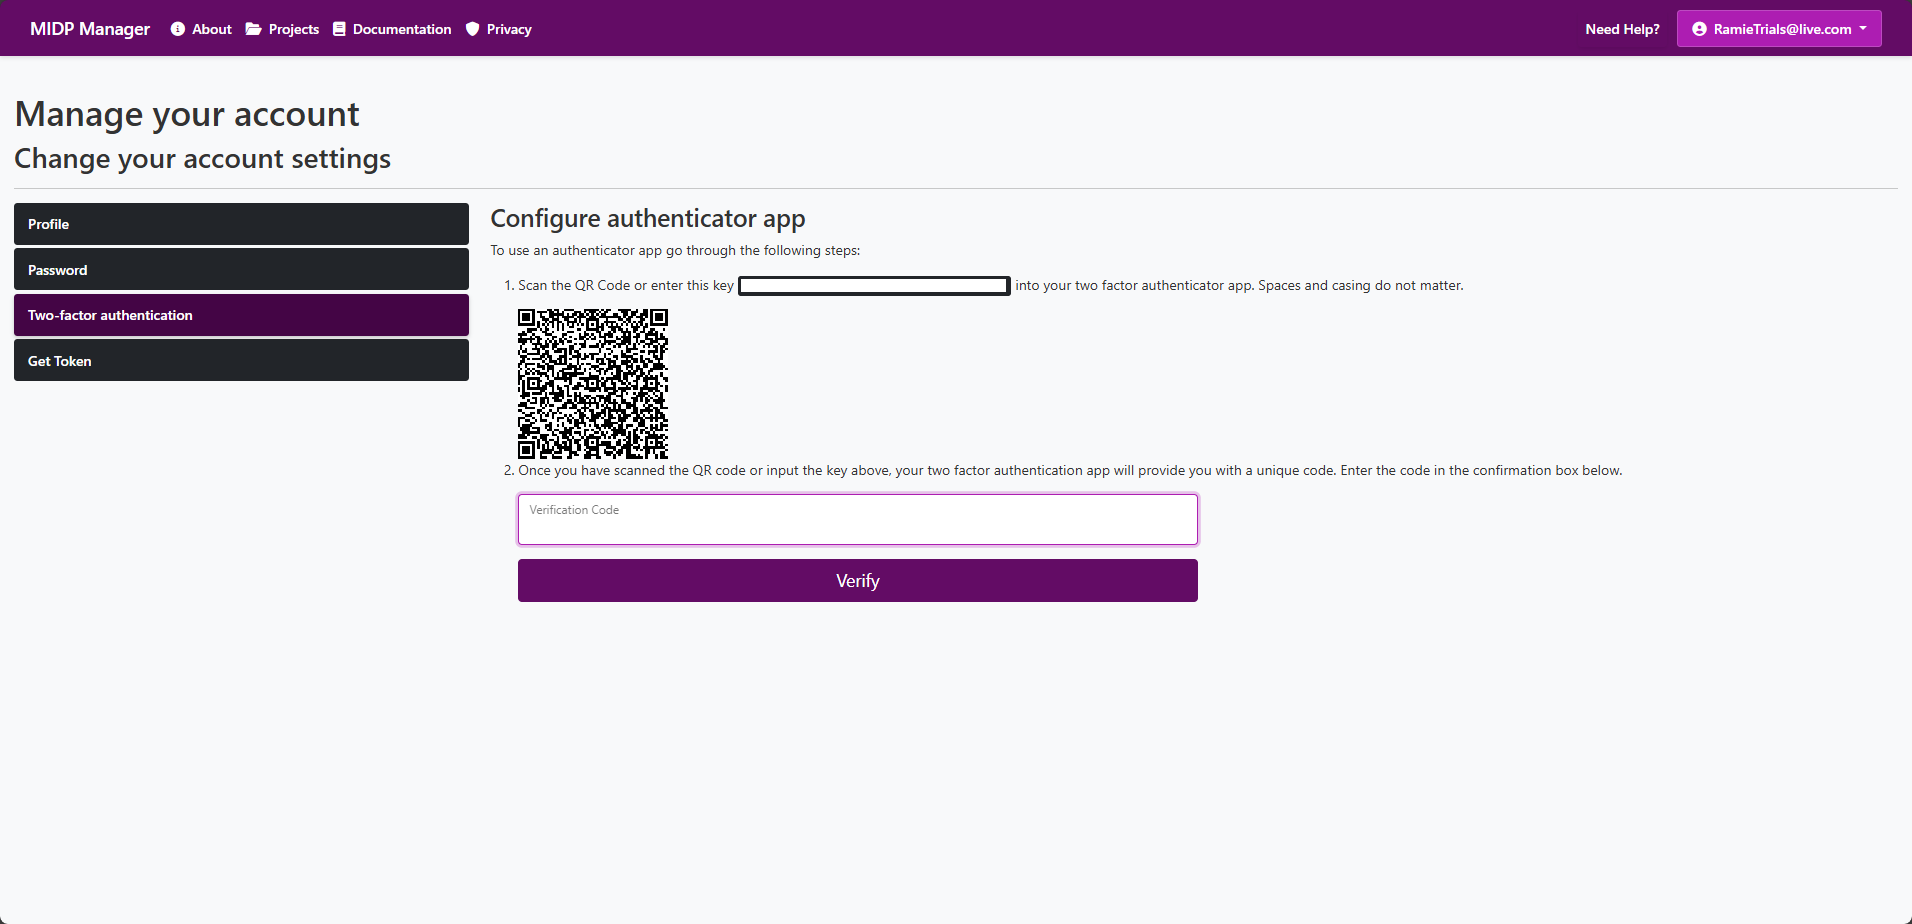
- If 2FA is enabled, enter the authenticator code or use a recovery code.
Step-by-step (Jacobs SSO)
- Click the Sign in with Jacobs / SSO button.
- You will be redirected to the Jacobs login page; provide corporate credentials if prompted.
- Complete any corporate MFA if required.
- After successful authentication you will be redirected back and signed in.
Expected result
User lands on the About or the Projects list.
Screenshots

Common errors & fixes
- Invalid credentials — check email/password or use Forgot password.
- SSO not available — try a different browser, clear cookies, or contact IT if corporate SSO is down.
- 2FA codes expired — use a recovery code or request a new code.
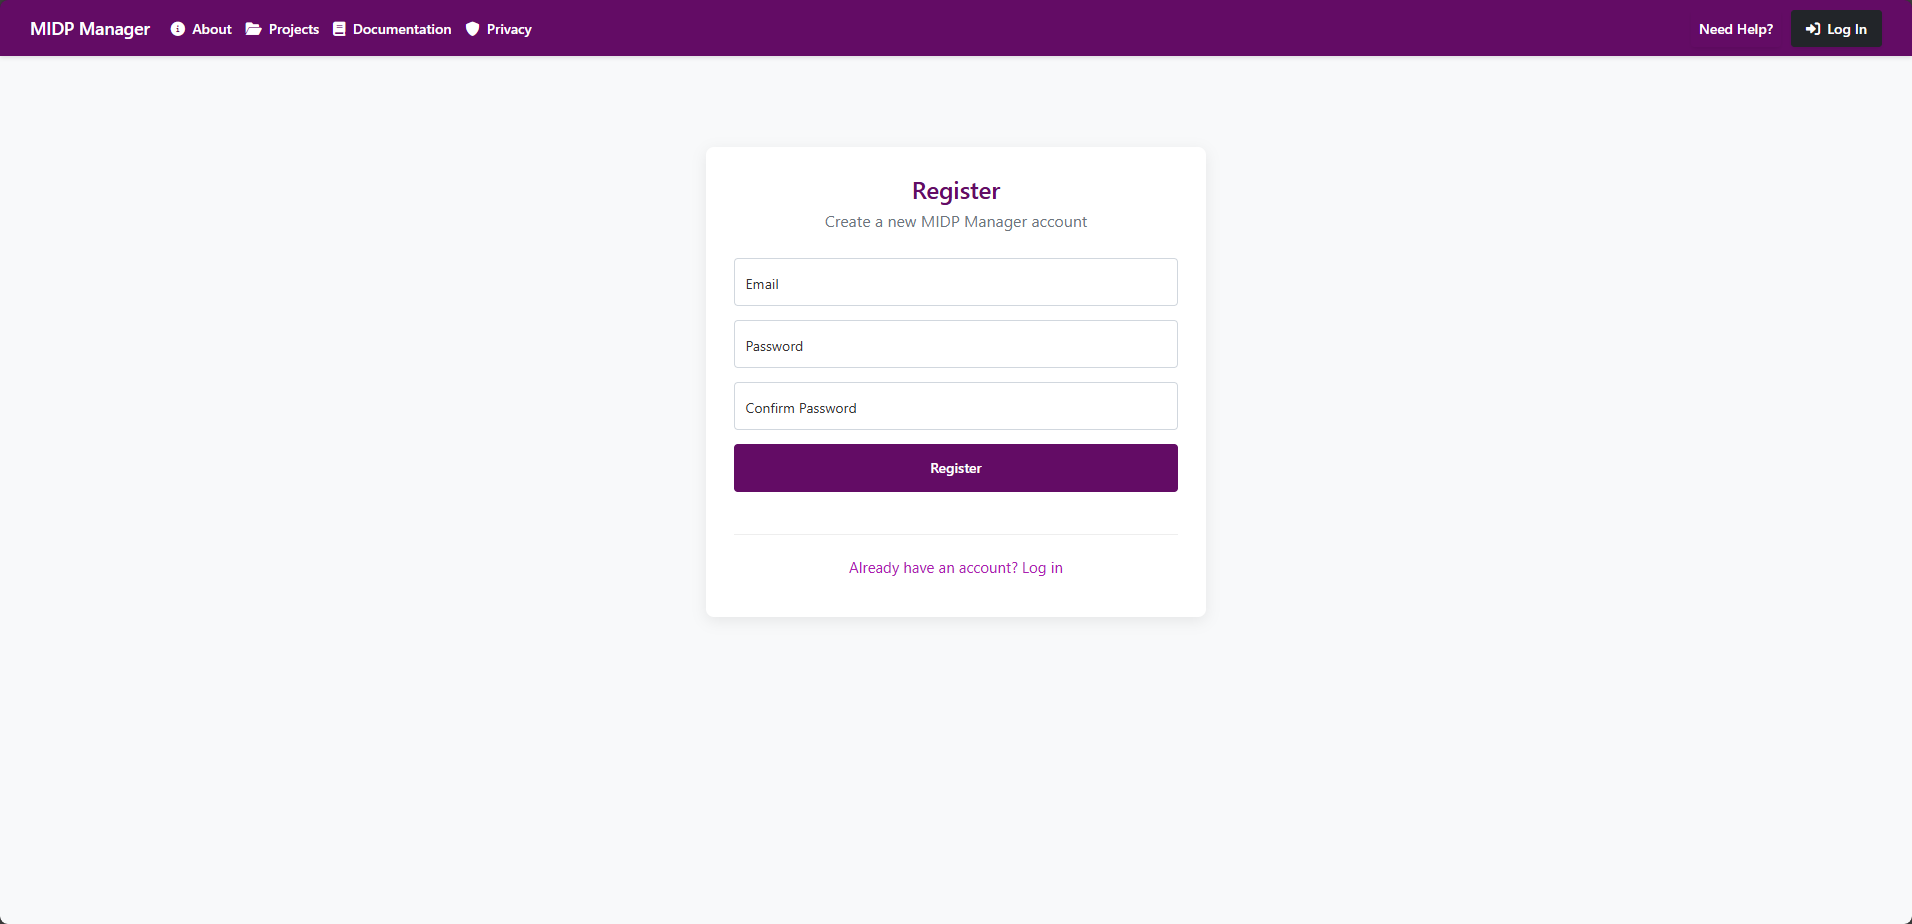
Brief: Create a new user account, confirm your email, and sign in to access MidpManager.
Pre-requisites
- A valid email address you can access to receive the confirmation message.
- If your email ends with
@jacobs.comyou should use the corporate SSO flow (see "Jacobs SSO" below).
Registration options
Email and password Standard
Self-service sign-up using name, email and a password. An email confirmation is required before the account is fully active.
Jacobs SSO SSO
Jacobs employees should use Sign in with Jacobs (corporate Single Sign-On). Local registration with a @jacobs.com email is blocked.
Password & validation rules (summary)
- Minimum password length: 6 characters (enforced by the registration form).
- Confirm password field must match the Password field.
- Local registration is disallowed for
@jacobs.comaddresses — use Jacobs SSO instead. - Email confirmation is required: accounts must be confirmed via the emailed link before they are fully active.
Step-by-step (Email + Password)
- Open the app and click Register / Sign up.
- Fill in the registration form: Full name, Email address (non-
@jacobs.com), Password and Confirm Password. - Click Create account (or Register).
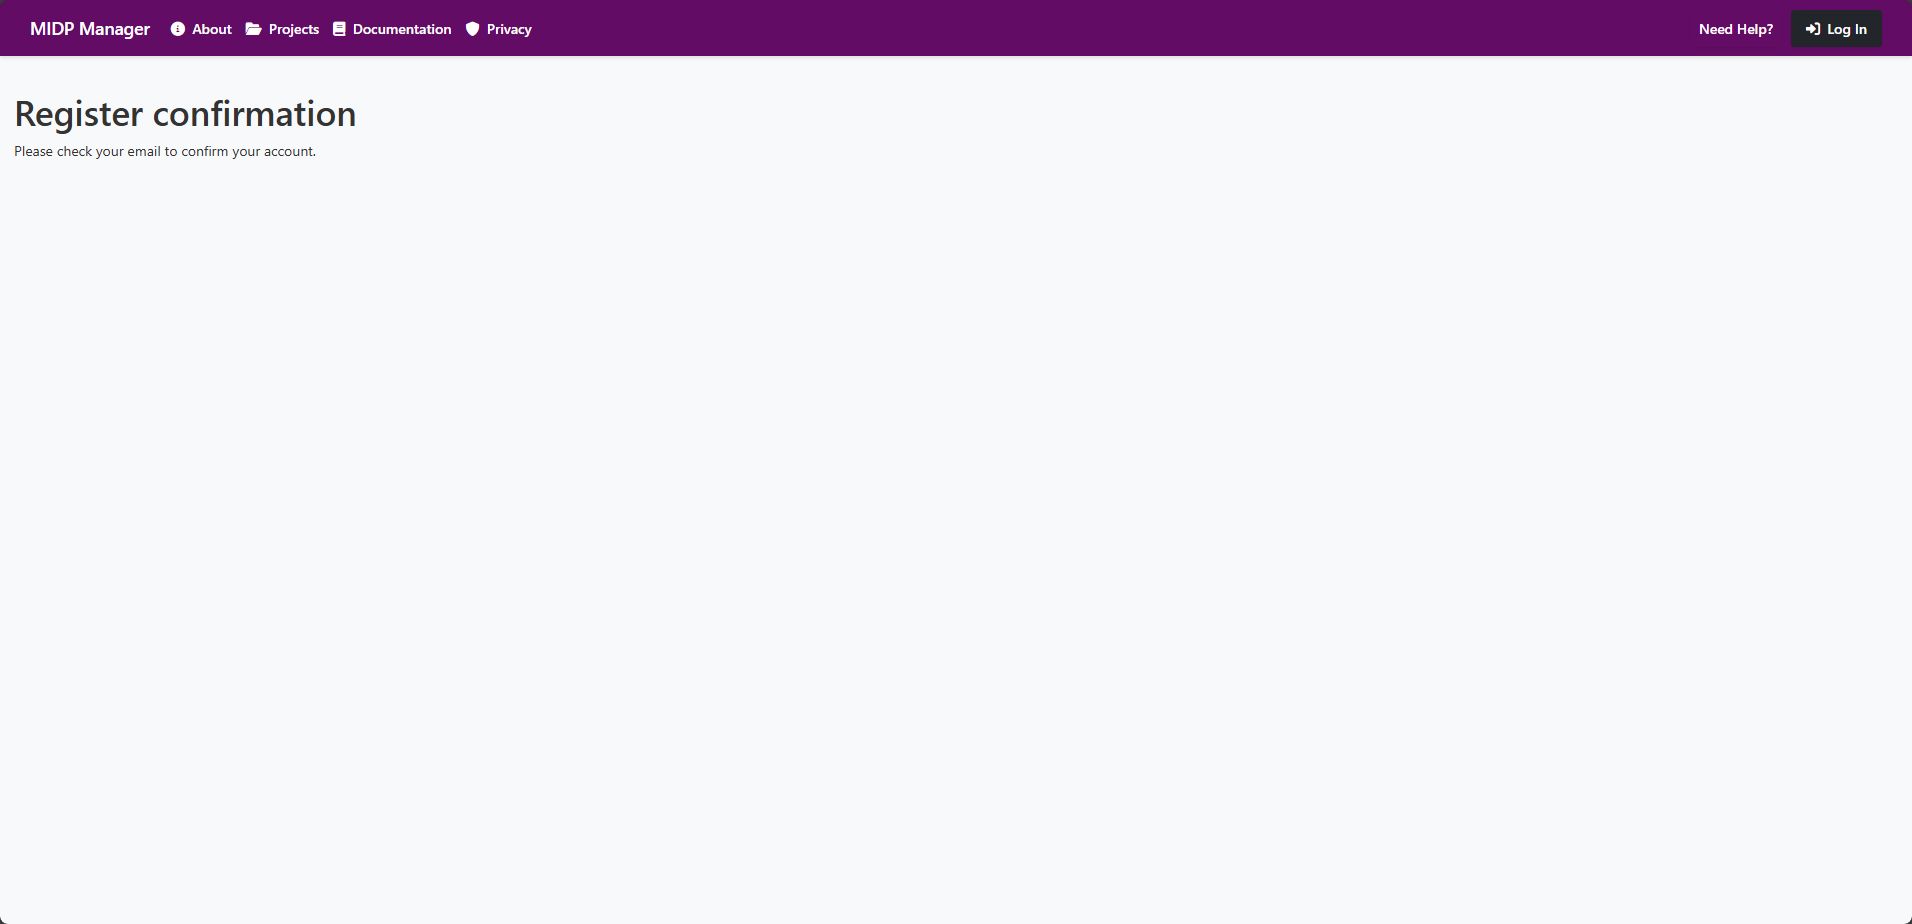
- The app displays a message that a confirmation email has been sent. The confirmation email contains a link you must click to activate your account.
- Open the confirmation email and click the activation link. If the link has expired use the "Resend confirmation" action from the Sign in page or the Resend Confirmation page.
- After confirming your email you will either be signed in automatically or prompted to sign in; successful sign-in lands you on the About page or Projects list depending on your account state.
Step-by-step (If confirmation link expired or not received)
- Check your spam/junk folder for the confirmation email.
- On the Sign in page click Resend confirmation or visit the Resend Confirmation page to request a new email.
- If emails still do not arrive verify the email typed during registration or contact support (include the email address and approximate registration time).
Step-by-step (Jacobs SSO)
- Click the Sign in with Jacobs / SSO button from the Sign in page.
- You will be redirected to the corporate login page (Azure AD / OpenID Connect). Provide your corporate credentials and complete any corporate MFA if prompted.
- After successful authentication you are redirected back to MidpManager. If this is the first time the external login is used you may be prompted to complete a short profile step (for example to provide a display name) before the account is created/linked.
Expected result
After confirming your email or completing SSO you can sign in and access your projects. If your account requires administrative approval you may see a pending state and will receive email updates.
Screenshots
Common errors & fixes
- Email already in use — you may already have an account; try Sign in or use Forgot password to recover access.
- Weak password — ensure the password is at least 6 characters and that Confirm Password matches.
- Confirmation email not received — check spam/junk, verify the email typed during registration, or use the Resend confirmation feature.
- Confirmation link expired — request a new confirmation email and complete the flow promptly.
- Cannot register with @jacobs.com — registrations using
@jacobs.comare blocked; use the Sign in with Jacobs SSO button.
Troubleshooting tips
- If the UI shows validation errors, read the inline messages — they typically indicate which field failed and why.
- Capture a screenshot of any server-side error messages and include the exact steps you followed when contacting support.
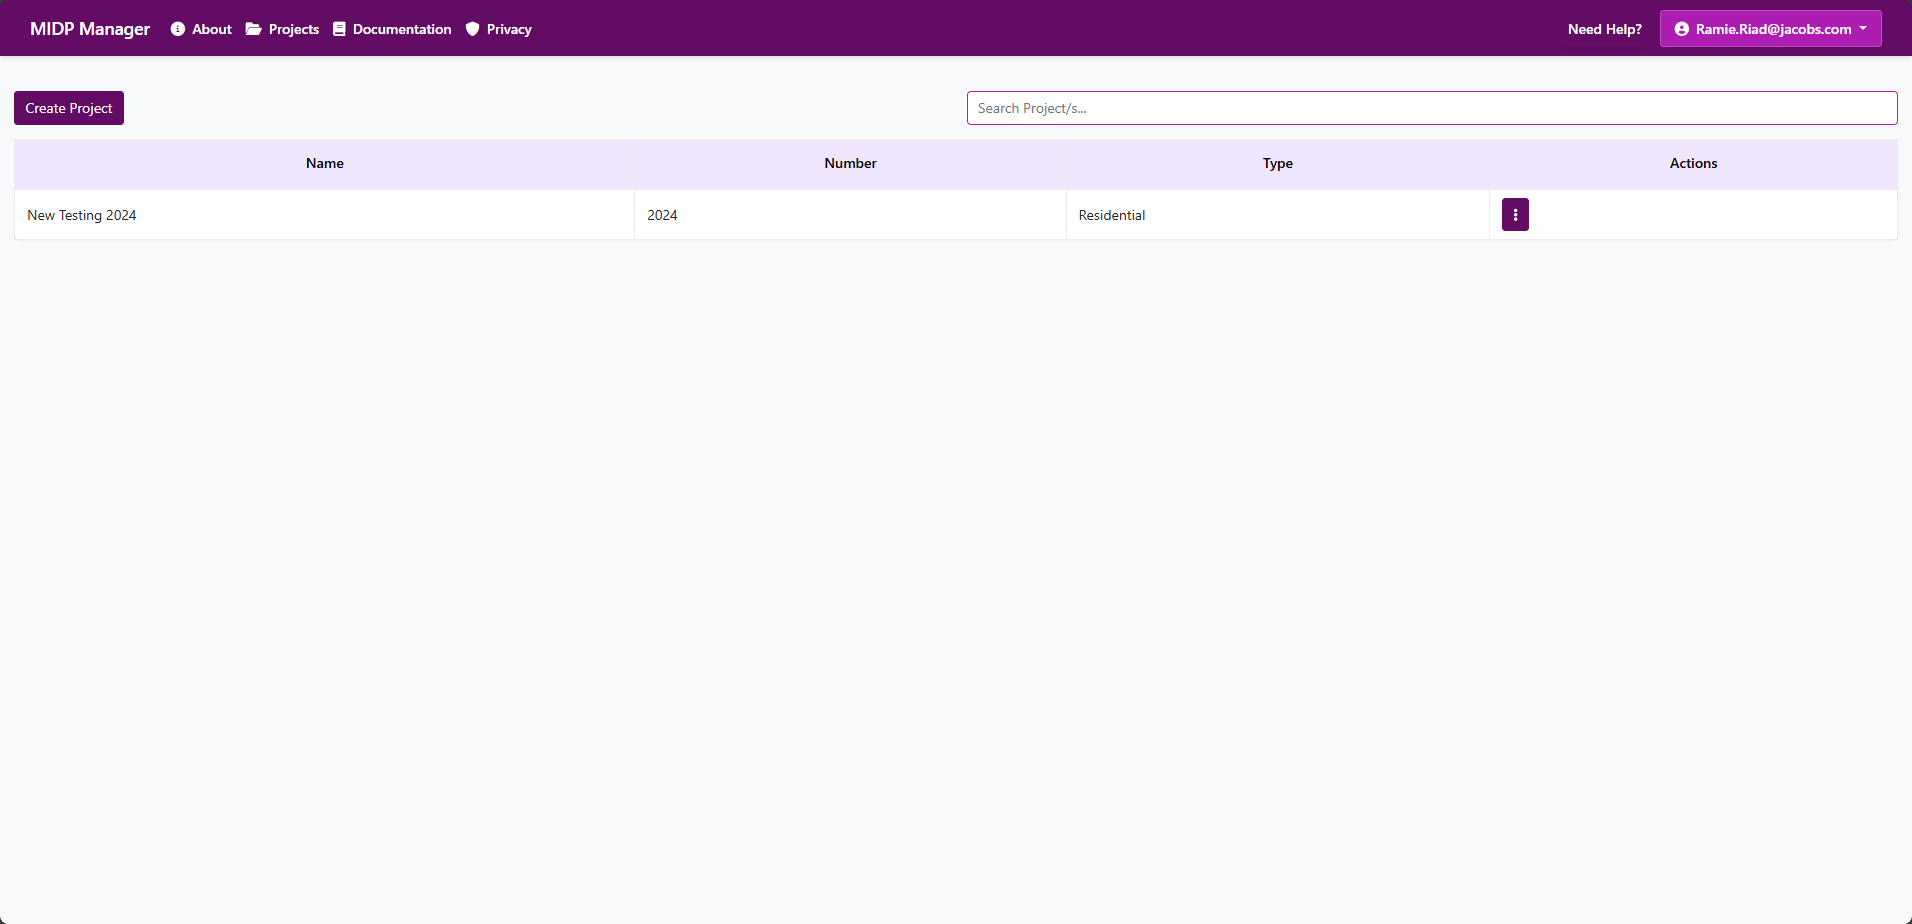
Create a project — step-by-step guide
Purpose: Create a new project workspace to manage documents, attributes, numbering and requests for a project-specific team.
Who can create a project
- You must be signed in, have 2FA and recent email confirmation per site policies.
- Explicit permission: your user account must have the permission to create a new project
- On creation the system automatically adds the creating user as a Project Admin.
Where to start
- Go to the Projects page (menu > Projects).
- Click the Create Project button. If it is disabled, you don't have the permission to create a new project.
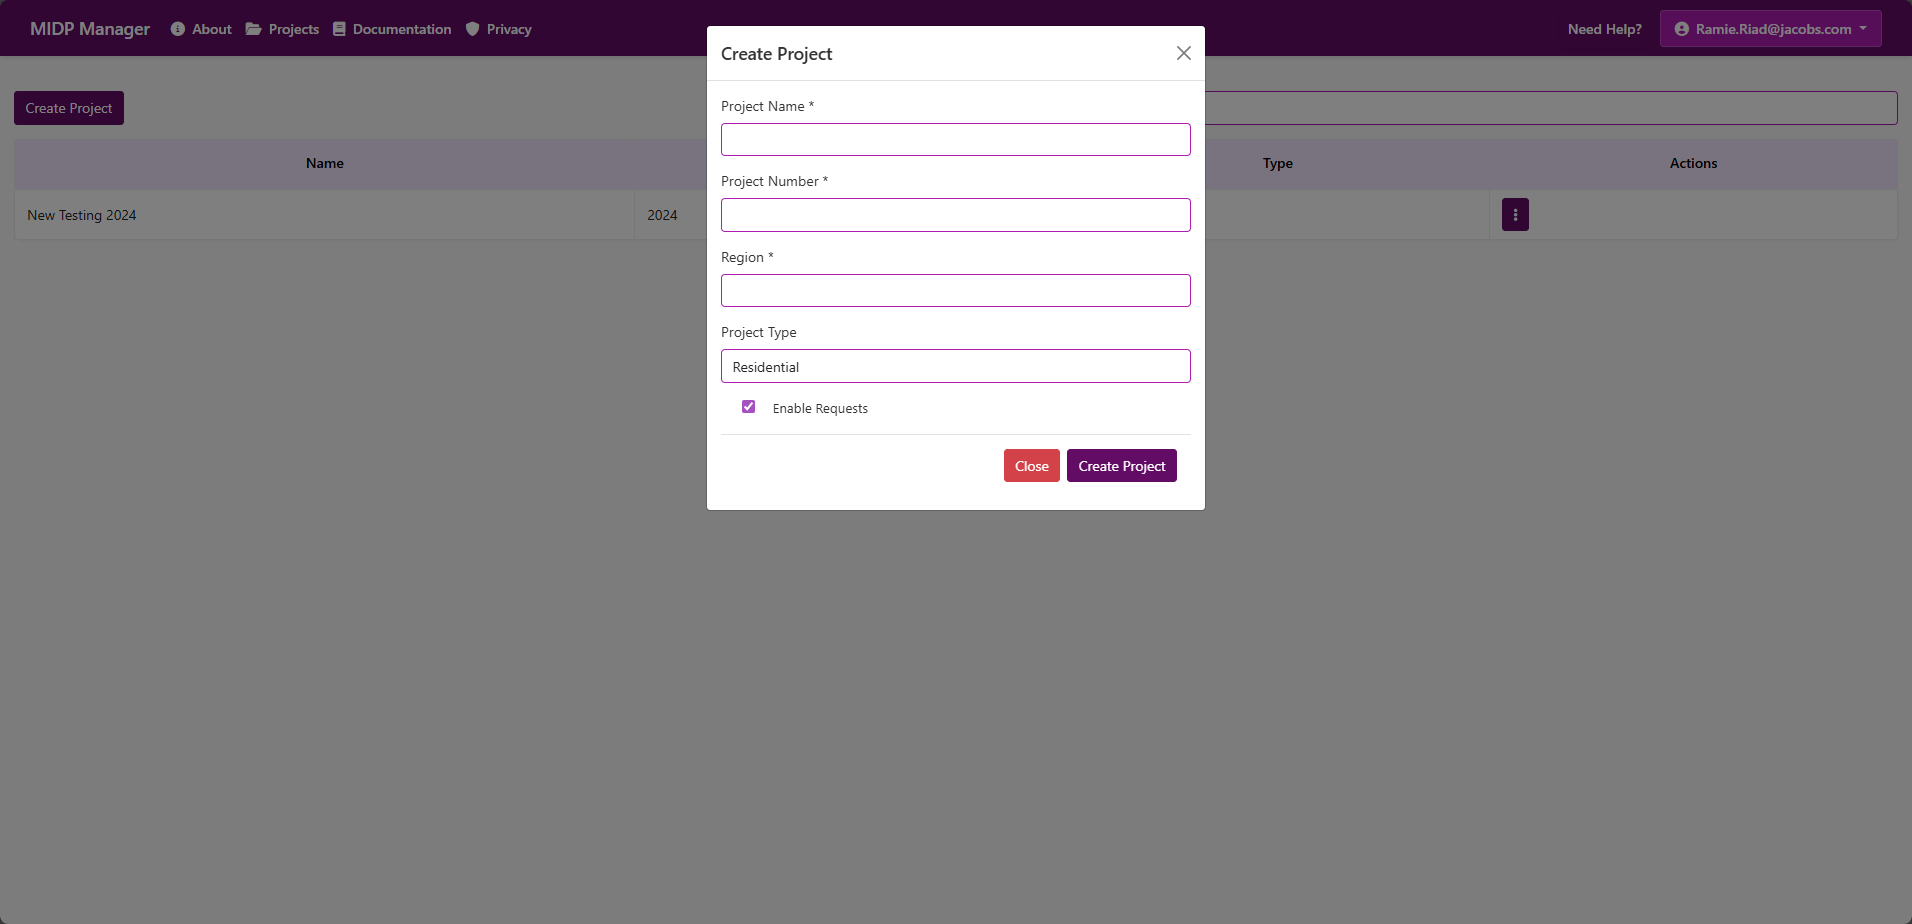
- A form will open. Fill the fields described below.
Fields on the form
The form matches the app model and contains the following inputs (all required unless noted):
- Project Name * — a human-readable name. This is required and must be unique within your organisation. If the name is already used you will see an error.
- Project Number * — a short identifier or code for the project (e.g., P-001). Required.
- Region * — text describing the region or location for the project. Required.
- Project Type * — select a type from the provided list (Residential, Commercial, etc.). This helps categorise projects and may affect defaults downstream.
- Enable Requests — checkbox to enable user-driven request workflows for this project (enabled by default).
What are Requests?
Requests provide a simple, auditable workflow where users can ask for actions or changes to documents and project data without needing direct edit rights.
- Purpose: capture user-initiated work items (e.g., publish a document, change metadata, request an archival) so approvers can review and act.
- Actors: the requesting user (Requester) and one or more Project Admins/Reviewers who can approve, reject or withdraw requests.
- Lifecycle: a request is submitted as Pending, then can be Approved, Rejected or Withdrawn. Actions and comments are recorded for auditing.
- Notifications: configured admins/reviewers are notified when a request is created or updated (see your project's notification settings).
- Examples: ask to publish a document, request a metadata change, ask for a document to be archived or restored.
- Control: the Enable Requests checkbox turns this workflow on for the project; Project Admins can change the setting later in Project Settings > Requests.
Permissions & behaviour after creation
- When the project is created the server records the time of creation and the creator.
- After the project is created the system automcatically:
- Creates the base attributes (default set) for the project.
- Adds the creating user as a Project Admin, so you can immediately manage members, attributes and numbering.
- If the create is successful you will be redirected back to the Projects list and see a success message.
Duplicate an existing project
You can duplicate an existing project using the Duplicate action (available to users who have the permission to create projects). The duplication process copies attributes and document numbering into the new project and also sets the current user as the admin for the new project.
Common issues & troubleshooting
- Create button is disabled
- What it means: Your account currently can’t create projects or needs account verification (for example, confirm your email or finish two-factor setup).
- What to do: Contact your project administrator and ask them to enable project creation for your account. If you see a message asking you to verify your email or complete two-factor authentication, follow those steps and try again.
- Project name missing or rejected
- What it means: The Project Name field was left empty, contains only spaces, or the name is already used.
- What to do: Enter a clear, unique name (for example, Building A - Phase 1), not just spaces. If the system says the name is already used, try a different name.
- Unexpected error when creating the project
- What it means: A temporary problem occurred (network or server error).
- What to do: Try again in a few minutes. If the problem keeps happening, contact support and include: your user name, the time you tried, the project name you used, and a screenshot of any error message. This information helps support fix the issue faster.
What to configure after creation (recommended)
- Project Members — invite team members and assign roles (Admin / Editor / Contributor / Viewer). You can do this from the project's Members page (only Project Admins can manage members).
- Attributes — configure project attributes that documents will use (attributes are created automatically with defaults; add or modify them in the Attributes page).
- Numbering — set up document numbering rules in Project > Numbering if you need custom document identifiers.
Screenshots
Project setup — attributes, numbering & details
Overview: Before you add documents to a project, set up the project details, attributes (metadata fields) and document numbering rules. These settings determine which fields appear on document forms, how document numbers are generated and how your team's documents are organised.
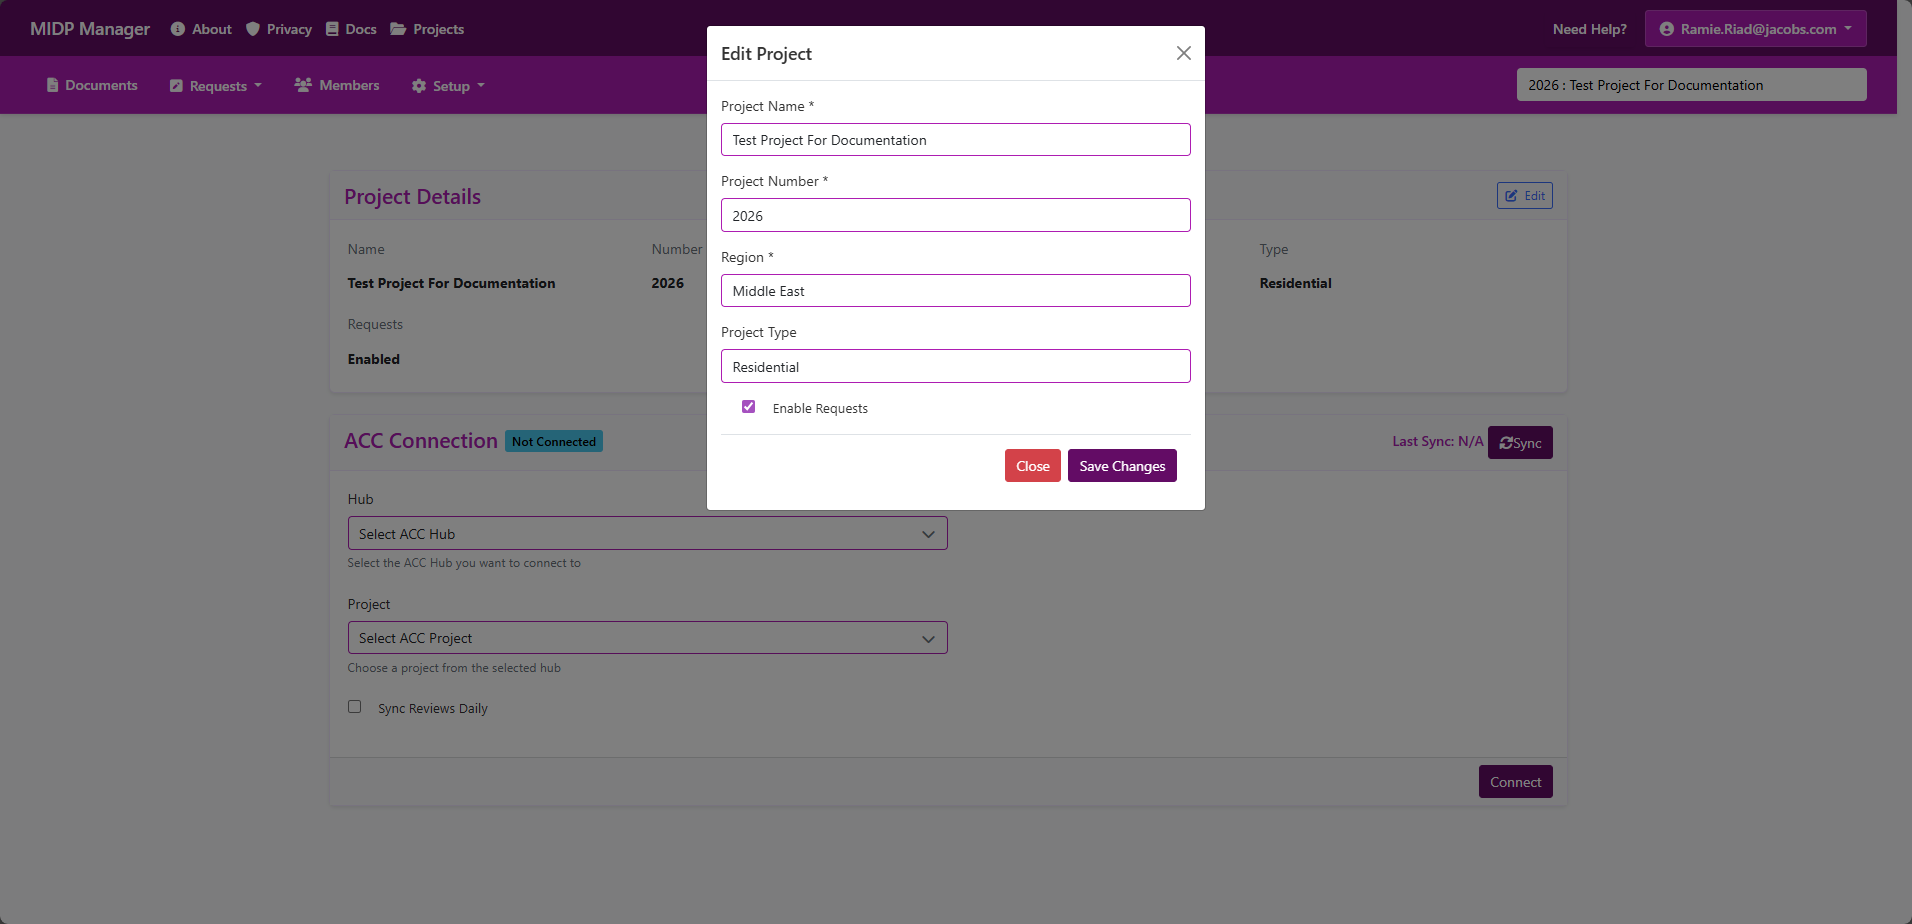
Where to find these settings: You can access all project-wide settings from Projects > Your project > Setup. There you can control Project Details, Attributes, and Numbering.

1) Project details
- Project name, project number and region are set when creating the project and can be edited from Projects -> Setup -> Project Details -> Edit.
- From Project Settings you can also enable or disable workflows (for example, Requests) and control other defaults for the project.
- Only Project Admins can change core project details.
Screenshots

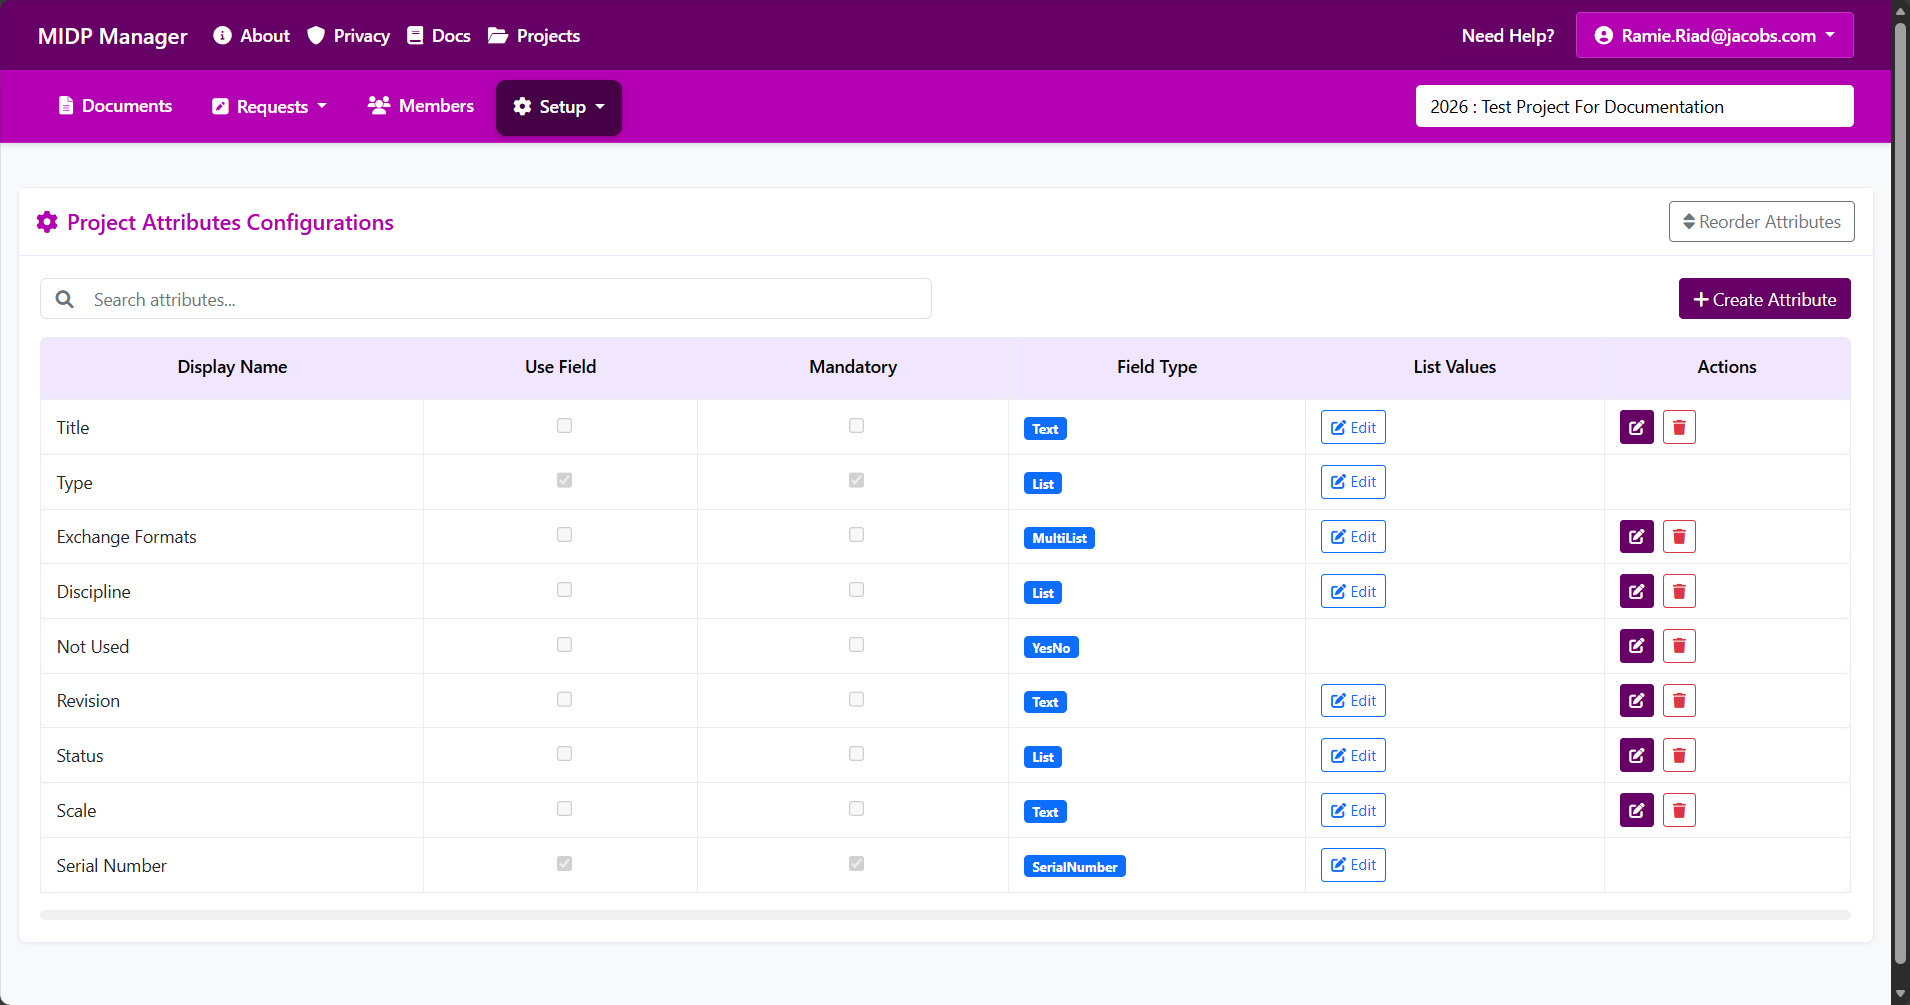
2) Attributes (metadata)
Attributes are the metadata fields that appear on document forms and in import/export templates. Examples: Discipline, Zone, Category, Serial Number.
What you can do
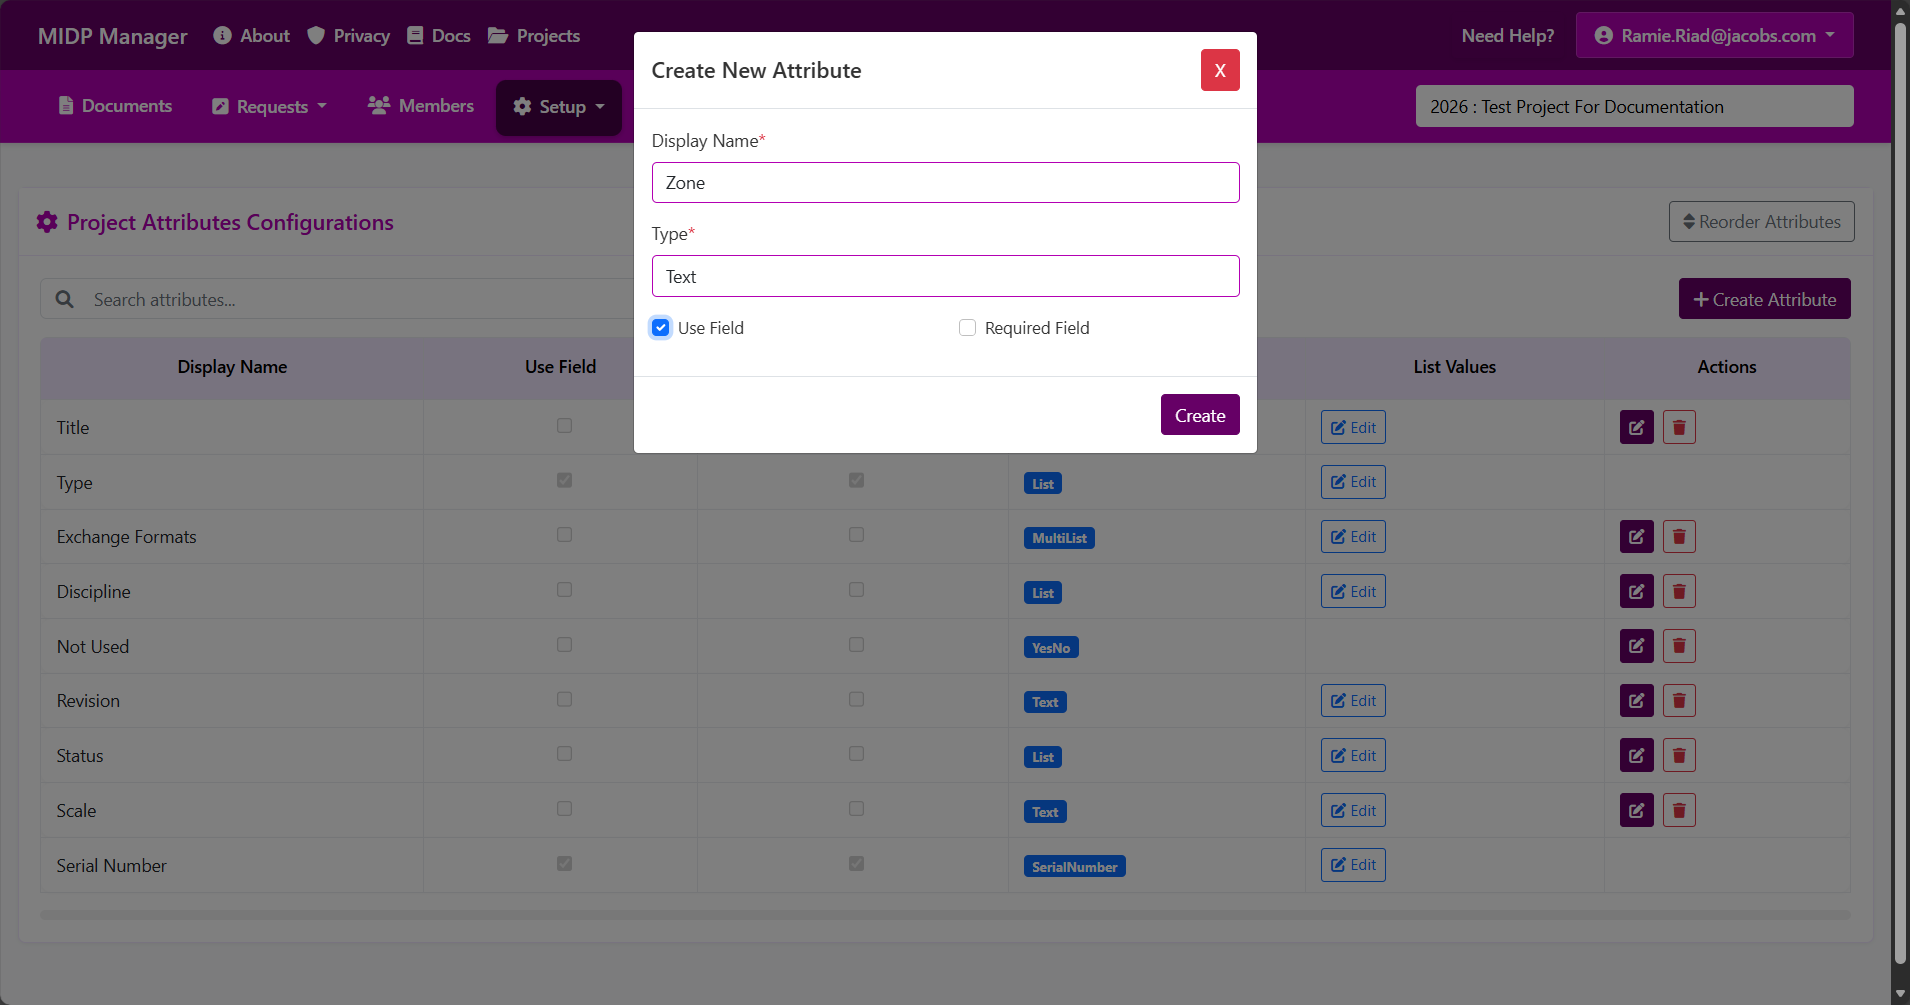
- Add a new attribute — give it a clear name (for example, "Zone") and pick the field type that best fits the data you will store.
- Edit an attribute — change its display name, whether it's visible on forms, whether it is mandatory, its default value, or the list of allowed values for dropdowns.
- Reorder attributes — change the order in which the fields appear on create/edit forms and in the batch/import templates.
- Delete an attribute — you can remove attributes that are not already used by existing documents. The system prevents deleting attributes that still contain data.
Key concepts (what each setting means)
- Display name — the label users see on forms and in templates. Make it unique and descriptive (for example, use "Zone" not "Z").
- Visible on forms (UseField) — when checked the attribute appears on the document create/edit forms, in the batch table and in import/export templates. Uncheck to hide fields you rarely use.
- Mandatory / Required — when enabled the field must be filled before the document can be saved or imported. Mandatory fields are always shown on forms.
- Field type — choose the input type that matches your data:
- Text — single-line text for short values (titles, small codes). You can optionally set a maximum length.
- Number — numeric values. You can set min/max constraints when needed.
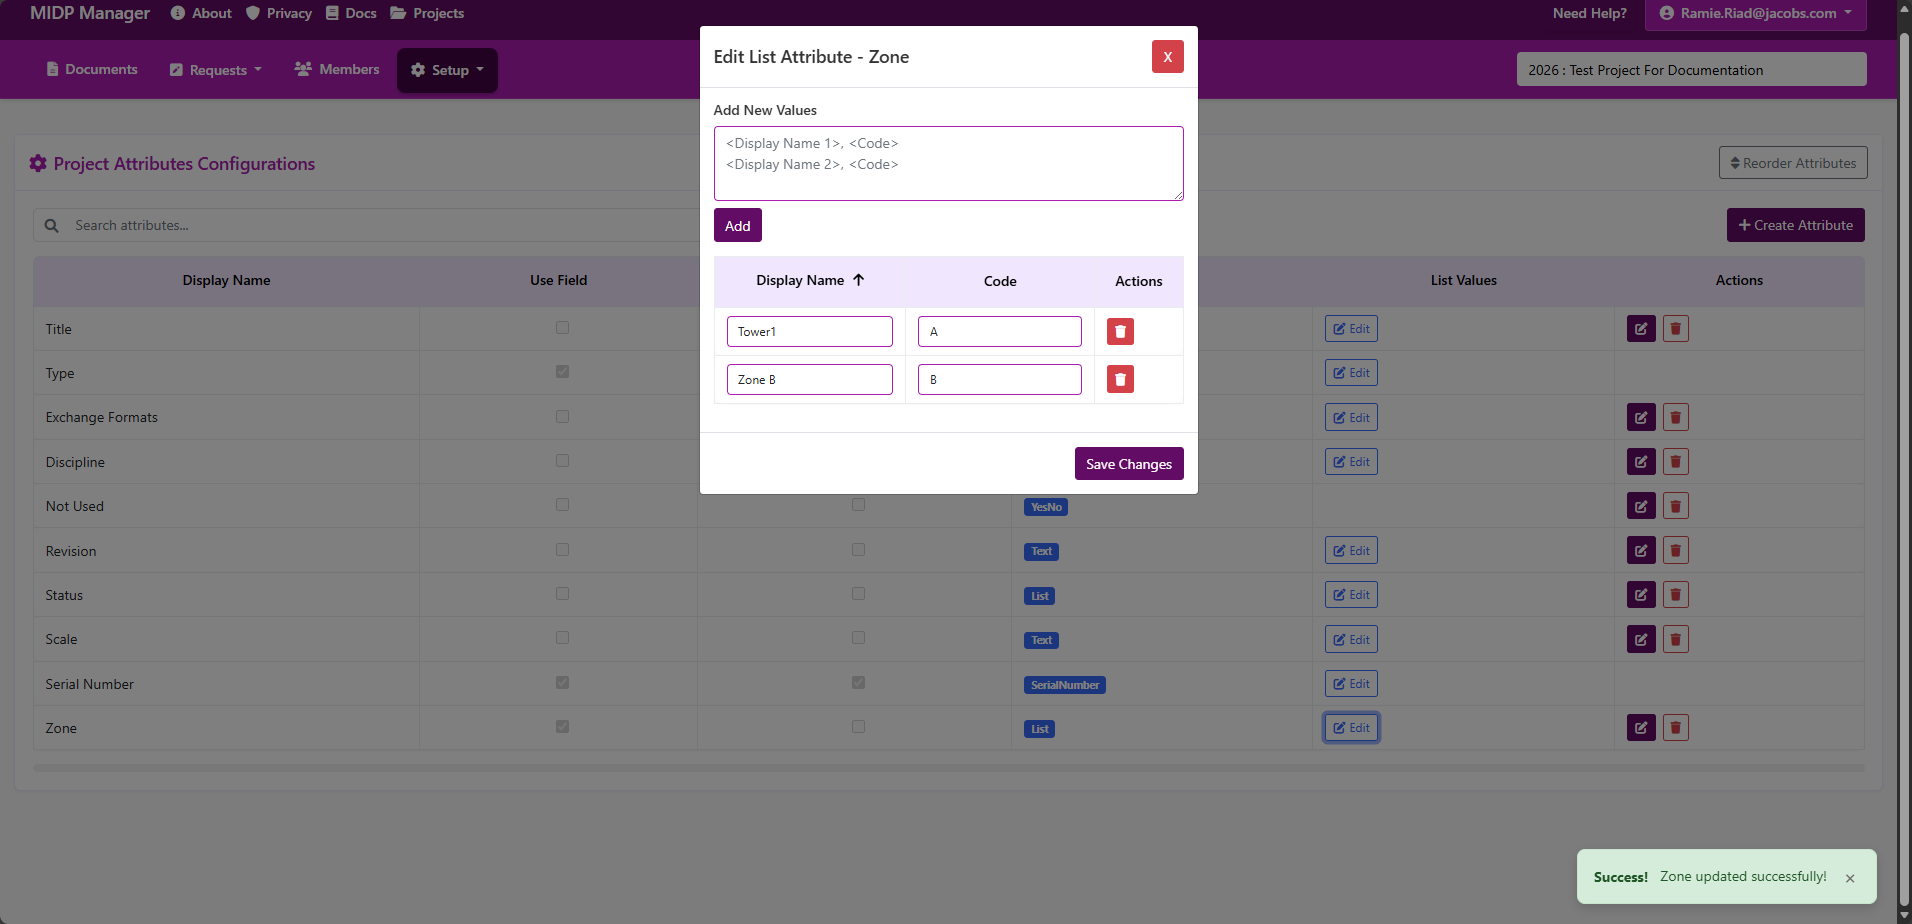
- List (Dropdown) — a single-choice dropdown. Add the allowed options (for example, Zone A / Zone B) so users select from a controlled list.
- Yes / No — a simple boolean choice (true/false) presented as a checkbox or switch.
- Multi-list (multi-select) — select multiple options from a predefined list (useful when a document belongs to more than one category).
- Cascading list — hierarchical dropdowns where the available child options depend on the selected parent values (for example: Country → Region → Zone).
- Serial Number — special field used when the project should manage serials/document numbers. Only one Serial Number attribute should be configured per project.
- List values / Options — if you choose Dropdown/List, add the allowed values (for example, "Zone A", "Zone B"). Using a dropdown keeps data consistent and makes searching and filtering easier.
Screenshots
Import & templates
- Import templates and the import process include only the attributes that are set to be visible on forms (UseField checked). If you want a column to be available in the Excel template, make sure the attribute has Use Field enabled
- Mandatory attributes will cause import rows to fail if the column is empty — make sure required fields are present in your spreadsheet.
- Column headers in the import template use the attribute display names, so keep display names stable if you regularly import data.
Practical tips
- Choose short, meaningful display names and avoid duplicates (for example, don't create two attributes both called "Title").
- Use dropdowns for controlled lists (zones, disciplines) to avoid typos in imports and documents.
- If you need to change an attribute that already has values, update list options carefully and consider communicating the change to your team before importing new data.
- Add attributes and set numbering before importing large numbers of documents — this avoids import mapping errors or missing columns.
- Only one Serial Number field should exist per project; use this field when you want the system to manage document serials.
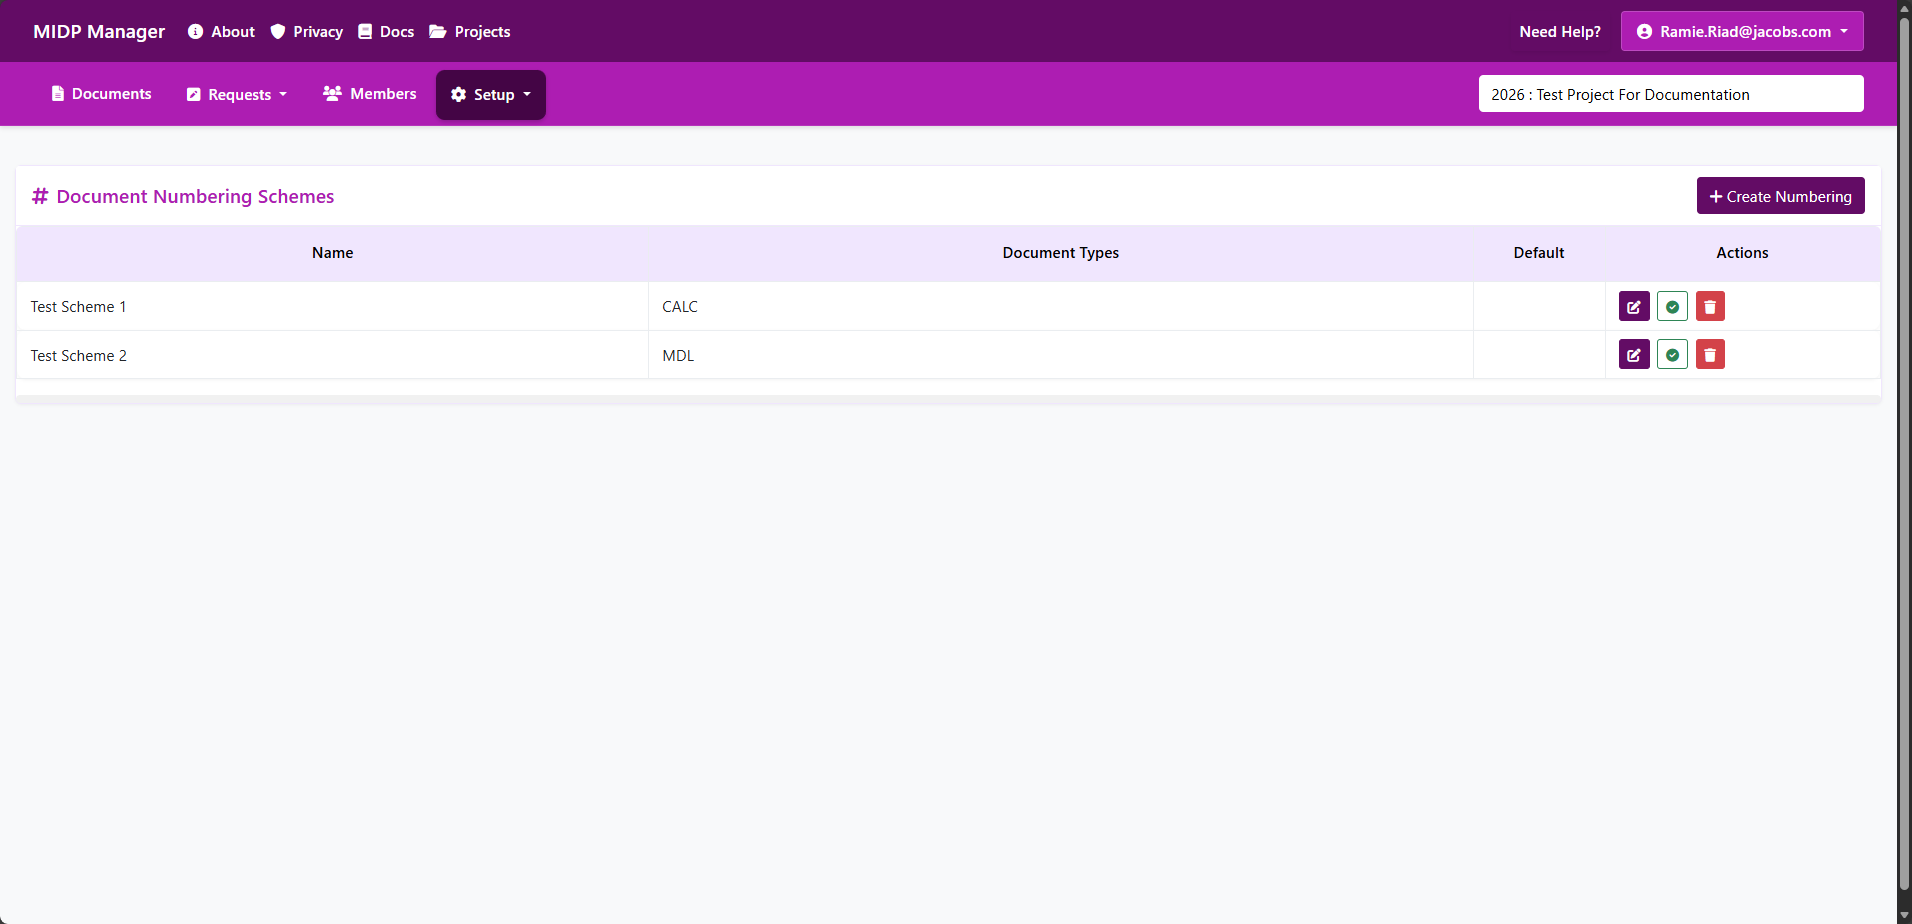
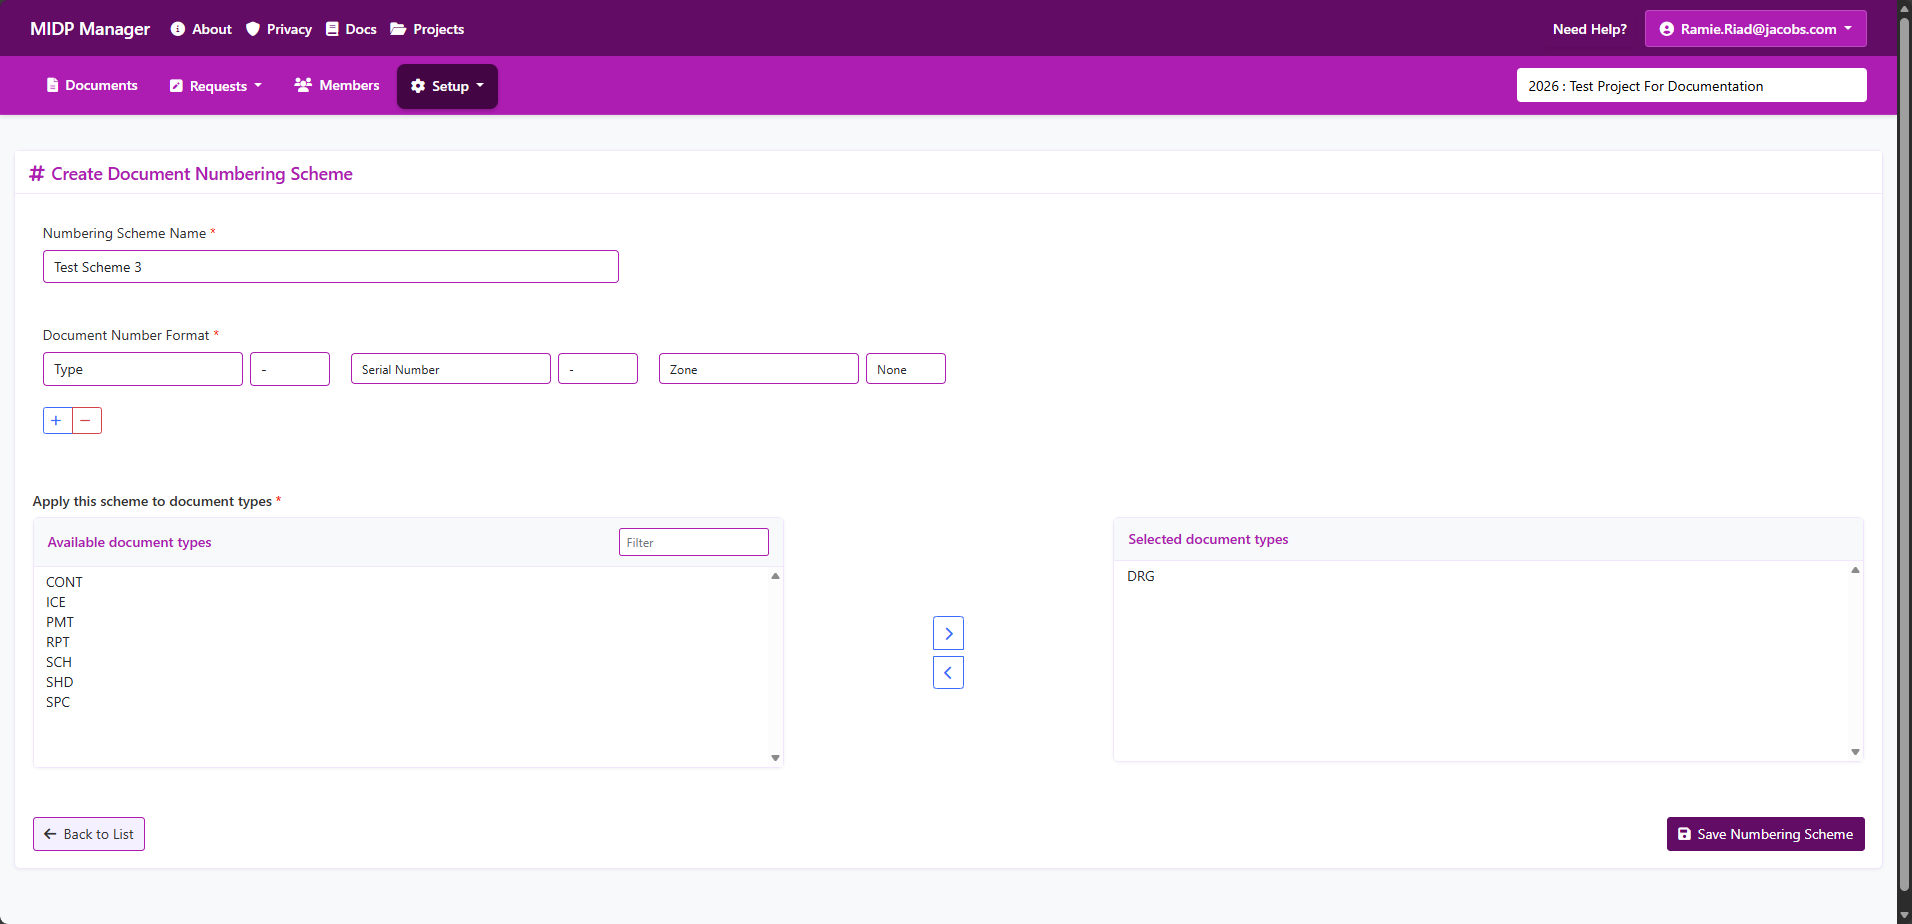
3) Numbering
Document numbering defines the visible identifier each document receives (the "Document Number"). Use numbering schemes to keep numbers consistent across your project and to support different formats for different document types.
- Numbering schemes — a scheme is a named format you create for the project. You can create multiple schemes (for example: one for Drawings, one for Reports) and mark one as the Default.
- How a scheme is built — schemes use a small ordered list of pieces (called a concatenation) which are combined to produce the final number. Pieces typically include:
- Fixed text (a prefix you choose)
- Attribute values (for example the Document Type or Zone)
- An auto-incrementing serial counter (the serial piece)
- Separators (dash, slash, space) between pieces to improve readability
- Example — a scheme defined as:
PROJ-Type-Serialmight produce: PROJ-DRG-0001. - Type-scoped and default schemes — you can assign a scheme to specific document types. When a document is created the app first looks for a numbering tied to the document's type; if none is found it falls back to the project's Default scheme.
- Serial handling & uniqueness — serials are incremented by the system to avoid duplicates. The app also checks existing documents and open requests during create/import to prevent collisions; if a conflict exists the create/import will fail for the affected rows.
- Preview & validation — the UI shows a preview of the assembled number format while you edit a scheme so you can check the output. The system validates the scheme when saving (required pieces, duplicate names, serial rules).
Practical notes for imports and bulk creates
- Always configure numbering before importing or batch-creating documents so imported rows receive the correct format and serials are reserved.
Quick admin steps
- Go to Projects > Your project > Setup > Document Numbering.
- To add a scheme: choose a name, build the concatenation (add prefix, attribute pieces, serial), and optionally assign document types.
- Set the most used scheme as Default so documents without a type-specific scheme use it automatically.
- Use the preview and then save; the UI will warn if the scheme is invalid or duplicates exist.
Tips & best practices
- Plan your numbering policy before importing documents — changing formats later is disruptive.
- Use attribute pieces (for example Type) to group numbers logically and make searching easier.
- Prefer system-managed serials to avoid manual mistakes; if manual numbers are allowed document reviewers should check for duplicates.
Screenshots
Create a document
Purpose: Add a new document to a project. Depending on your project's settings this will either create the document immediately or create a document request that must be approved.
Who can create documents
- You must be signed in and meet site security requirements (2FA and recent email confirmation) to create documents.
- Your account must have the Create Document permission for the project (typically Editors and Contributors; Admins always can).
Before you start
- Open the correct project — documents are always added inside a project context.
- Make sure project attributes (metadata fields) are configured if your document needs custom metadata like discipline, zone or serial number.
- Have the document file ready if you plan to upload an attachment.
Quick steps (UI)
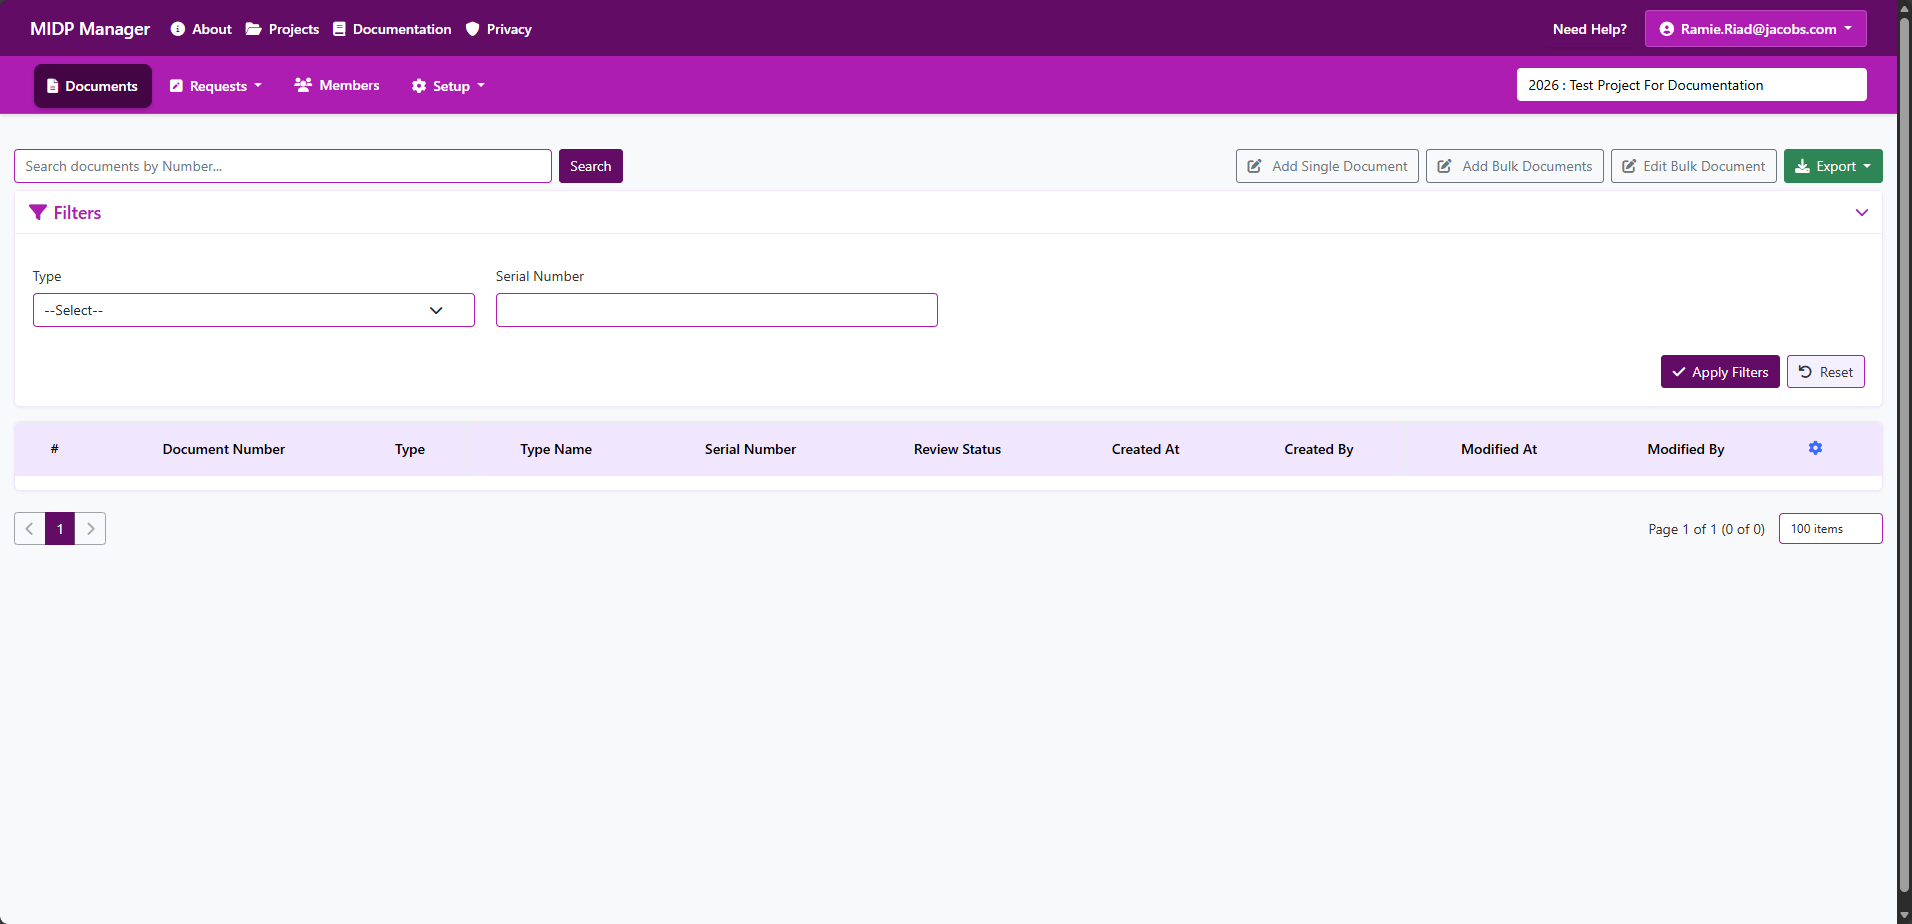
- Open the project and choose Documents from the project menu.
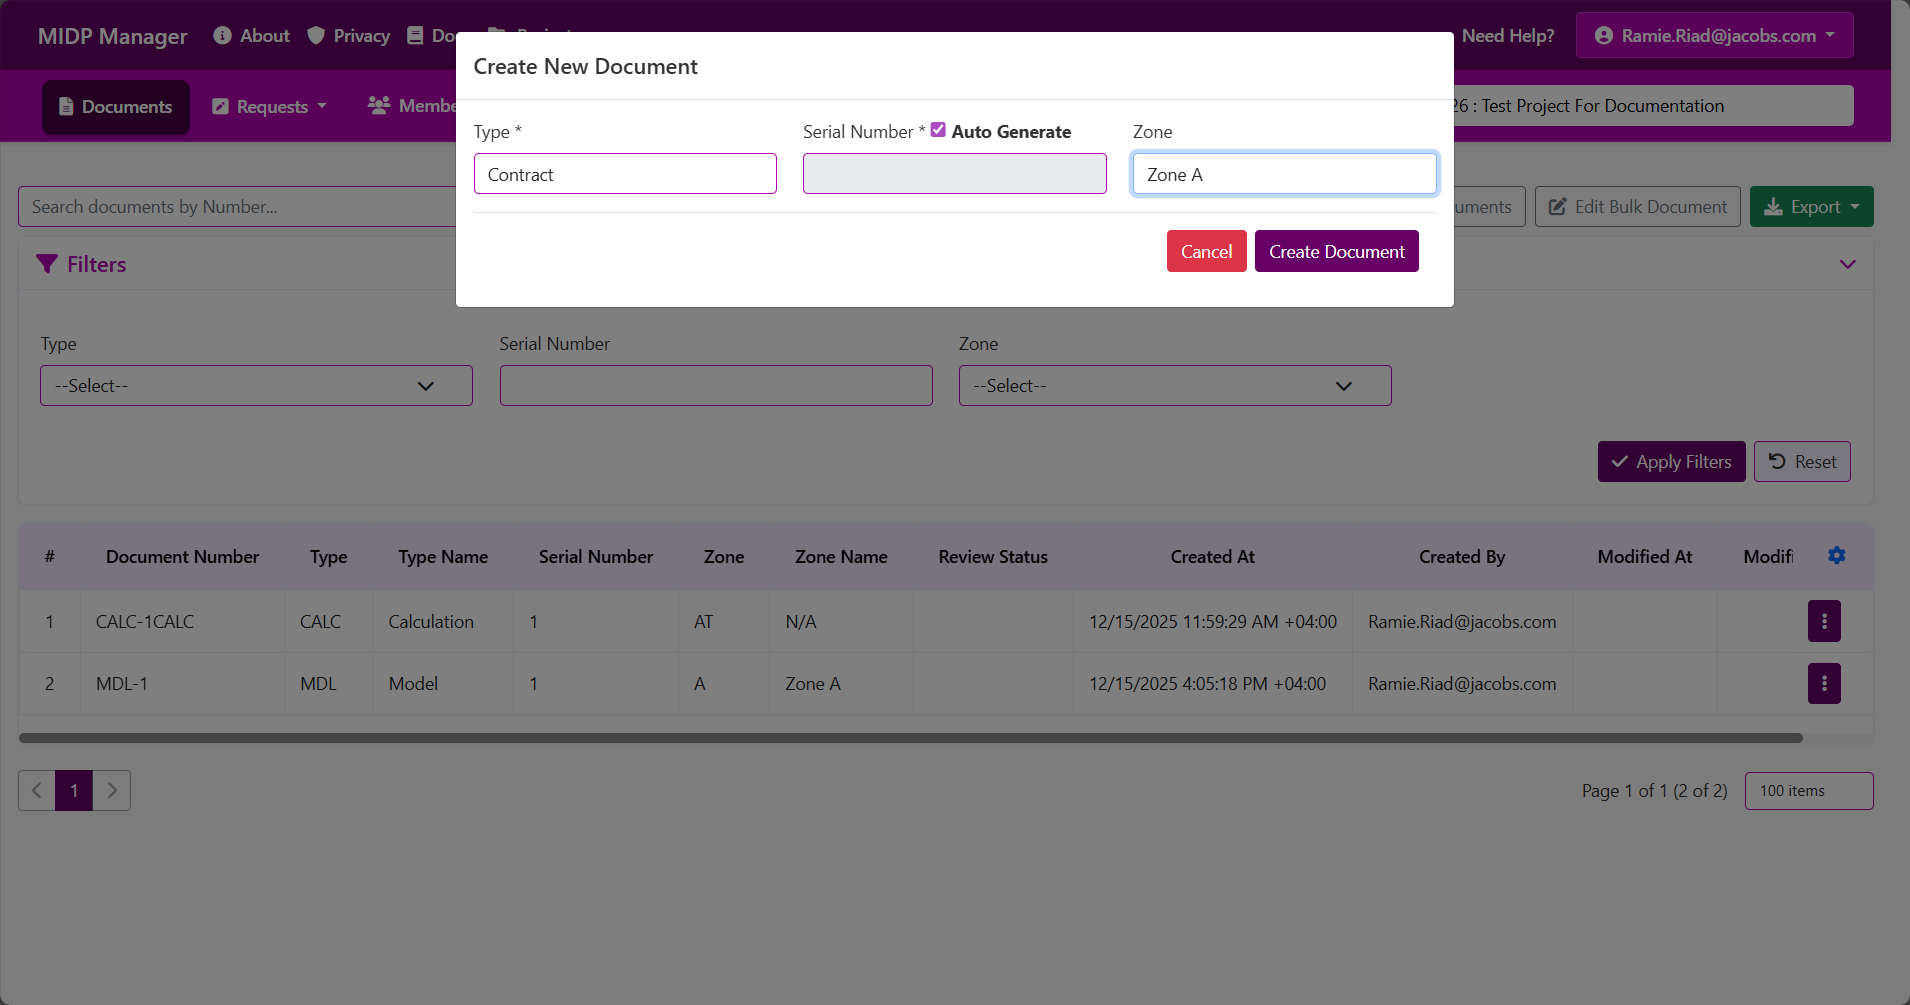
- Click New Document (or the + button) to open the document form or modal.
- Fill the form fields (see list below). Required fields are marked with an asterisk (*) in the UI.
- Click Create; you will see a success message or an explanation if the create fails.
Fields on the form (common)
The exact fields depend on your project's attribute configuration. Common inputs you will see include:
- Document Title / Name * — a human-readable title for the document.
- Document Number / Serial — a project-specific identifier. This may be auto-generated by the project's numbering rules or editable if your project allows it.
- Revision — document revision number.
- Attributes / Metadata * — project attributes (for example: discipline, category, zone). Required attributes will be shown as mandatory fields.
- Attached files — upload the primary document file (PDF, DWG, etc.). Some projects may allow multiple attachments.
- Description / Notes — optional free-text notes about the document.
What the app checks (in simple terms)
- Required fields are present — the form performs client-side validation and the server validates again.
- Document number uniqueness — the server prevents creating a document with a number that already exists in the project.
- Pending requests — if a request already exists for the same document number the create will be blocked and you'll see an explanation.
Request behaviour & lifecycle
- Depending on project settings a "create" action may create either:
- An immediate document (if creates are allowed without approval), or
- A Document Request which enters the project's request workflow (Pending → Approved / Rejected / Withdrawn).
- If a request is created you will receive a success message saying a new document request was created; Project Admins or Editors will be notified.
- When a request is approved the system will create the actual document record and it will be moved from the open documents to the documents history.
Common problems & how to fix them
- Duplicate document number — Change the number (if editable) or ask a Project Admin/Editor to resolve the existing document/request that blocks this number. Some projects use automatic numbering; in that case leave the number blank and let the system generate it.
- Validation errors for attributes — Ensure required attribute fields are filled. If an attribute looks missing from the form, contact the project Admin to configure attributes in Project > Attributes.
Tips & best practices
- Use clear, consistent document titles and numbering to make searching and referencing easier.
- When the numbering is automatic, avoid manually entering numbers to prevent conflicts.
- When submitting many documents at once consider using the Batch Create feature (Documents > Batch Create)
Screenshots
Expected result: When you submit a valid document create request you will see a success message. If the project requires request approval the document will appear when the request is approved; otherwise the document will appear immediately in the project's Documents list.
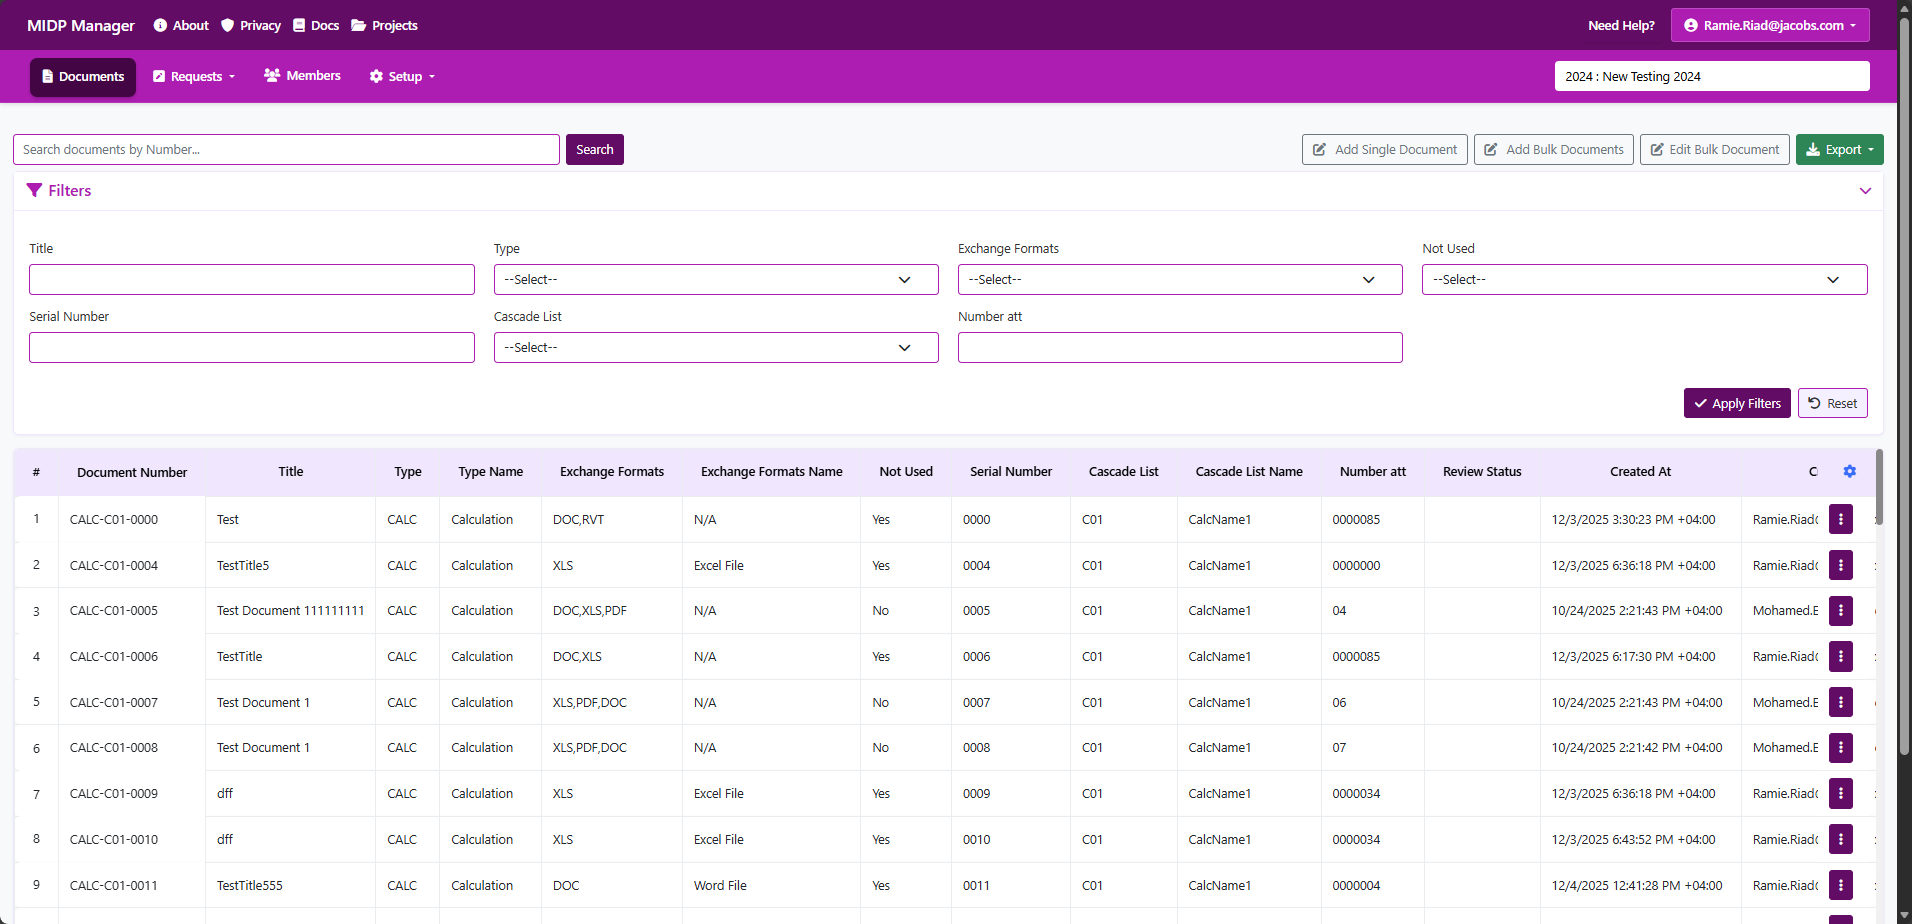
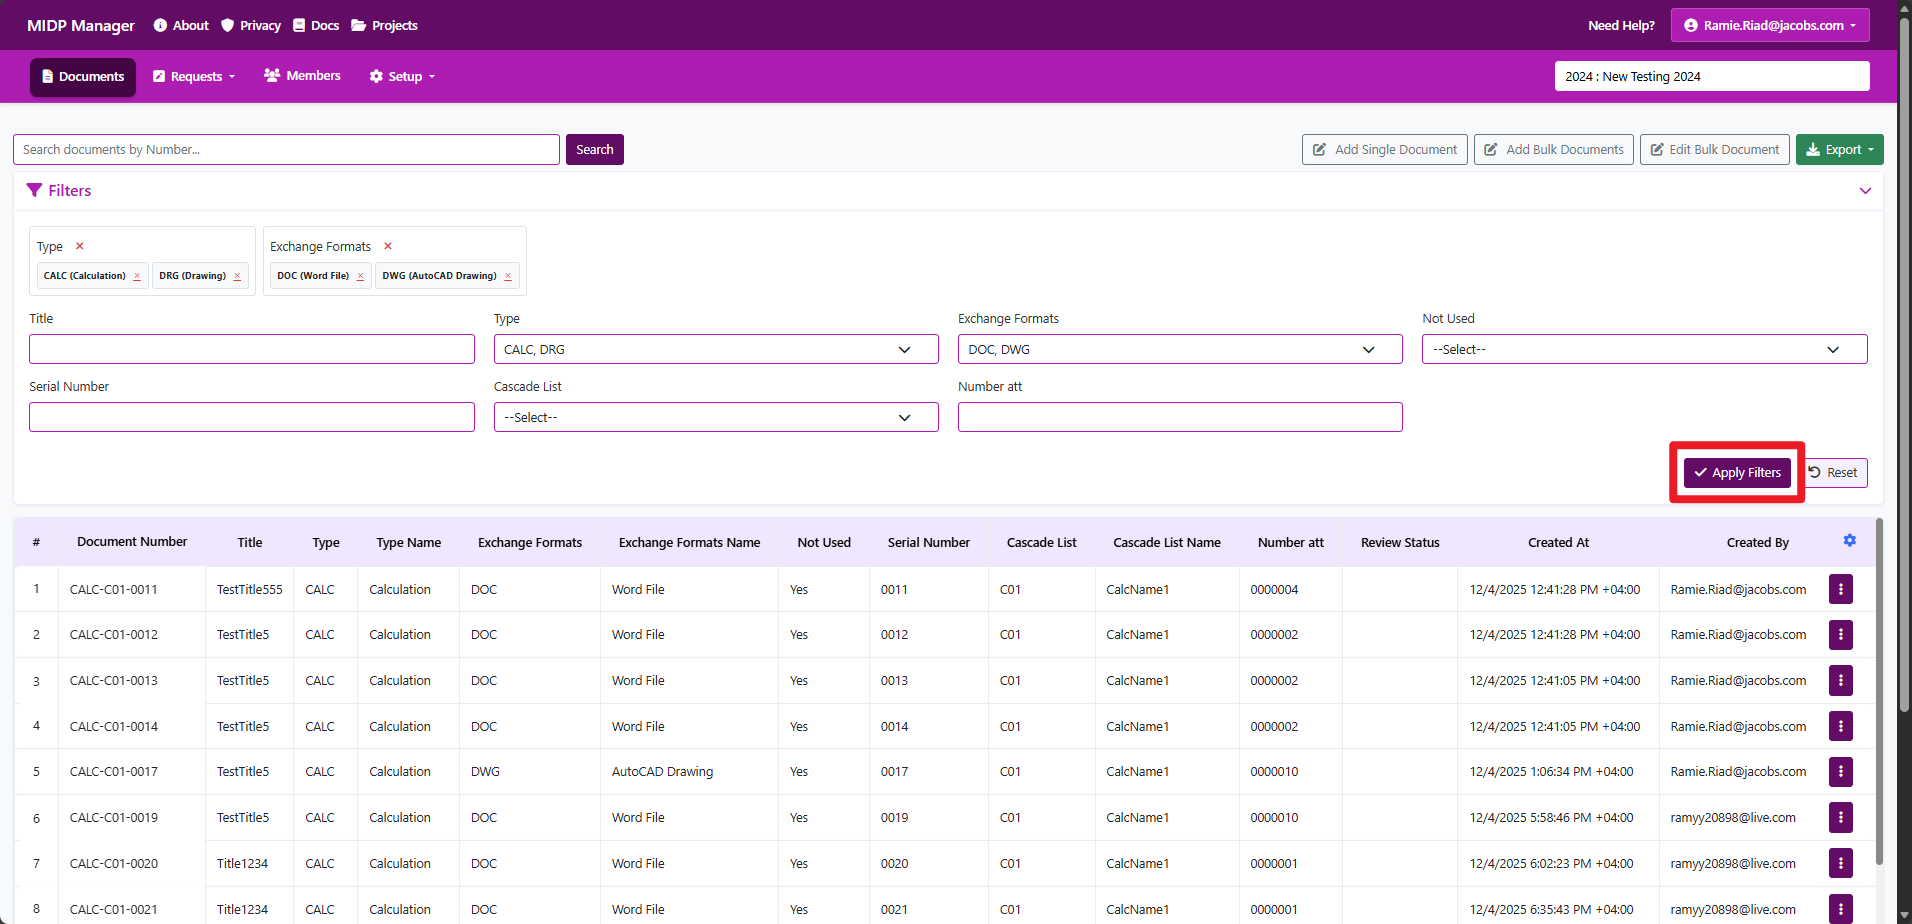
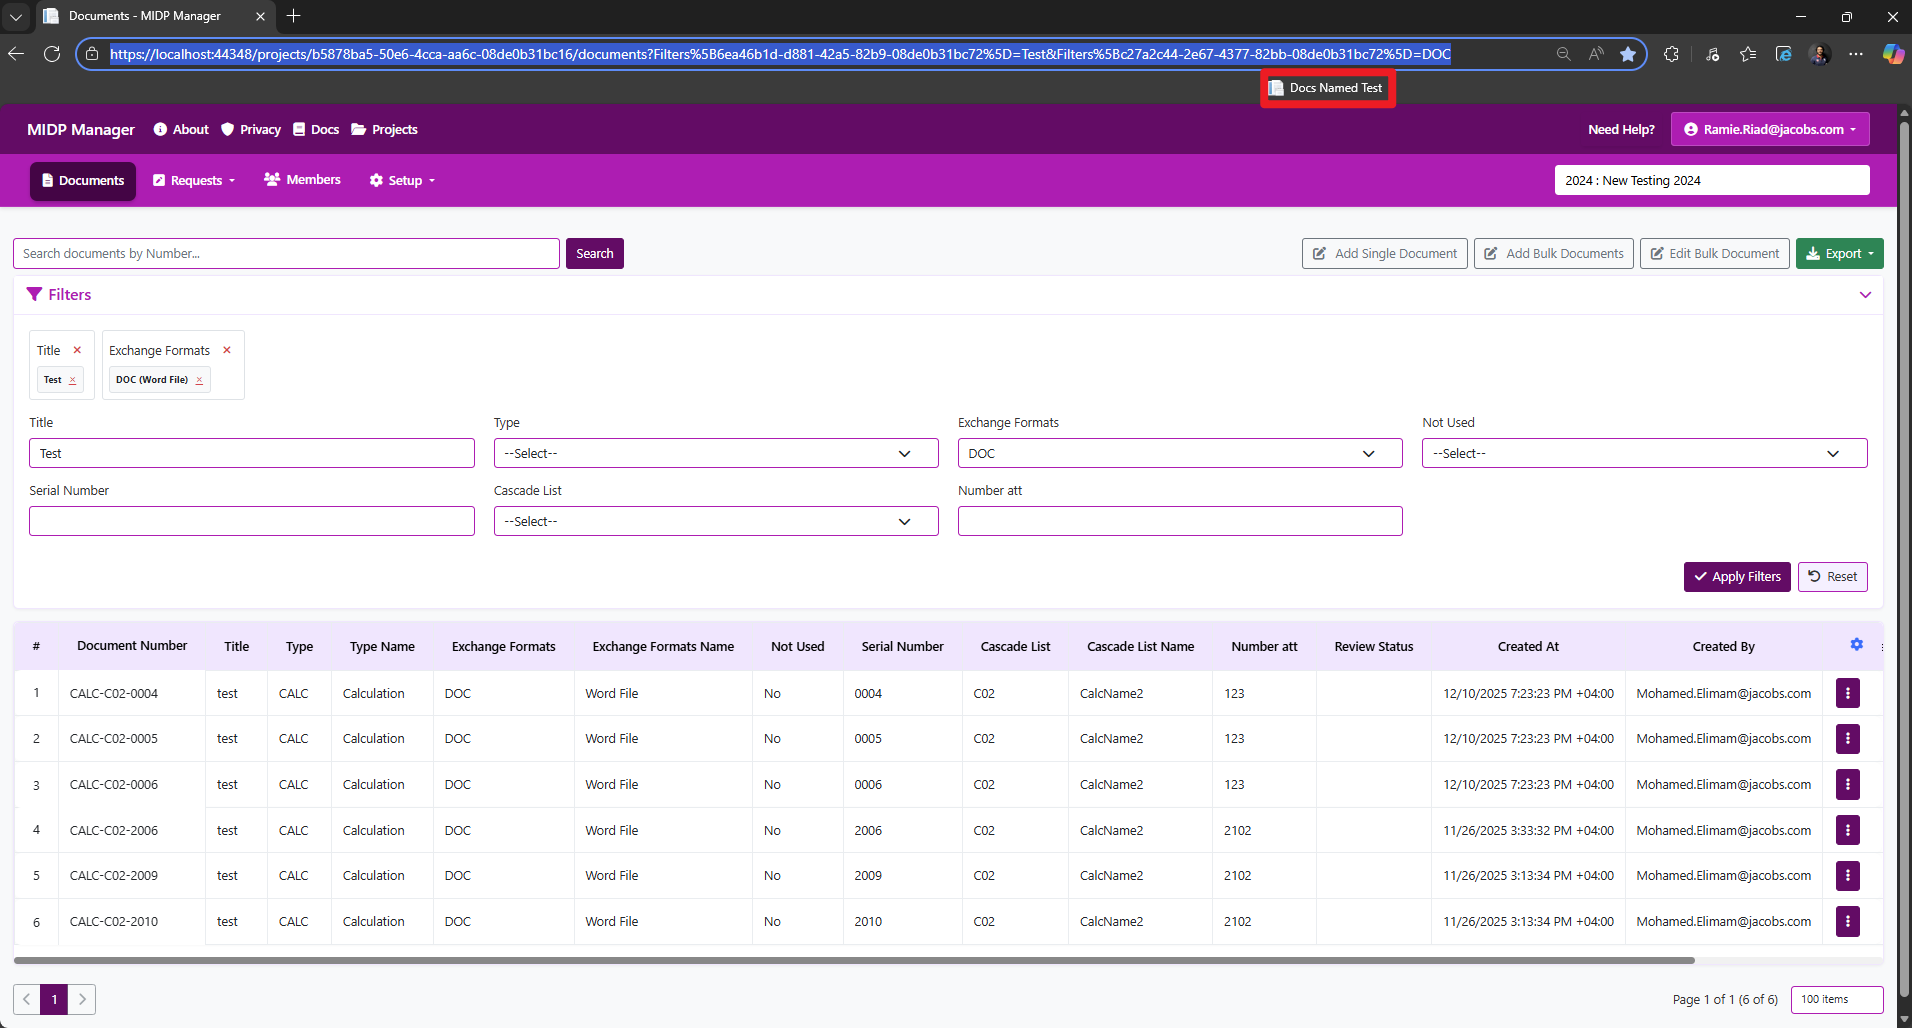
Document Filters — step-by-step guide
Purpose: Quickly filter and find documents in your project based on user-defined project attribute values, making it easy to view specific subsets of documents (e.g., all "DMP - CR36" documents, all documents with a specific discipline or phase).
What are Document Filters?
Document filters allow you to narrow down the documents table by selecting specific values for the project attributes that your Project Admin has configured. Instead of scrolling through hundreds or thousands of documents, you can instantly show only the documents that match your criteria.
Where to find Filters
- Navigate to any project's Documents page (Projects > [Your Project] > Documents).
- Look for the Filters card at the top of the page, just above the documents table.
- The filters section is collapsible — click the header to expand or collapse the filter controls.
How Filtering Works
Filters work by matching attribute values in your documents against the values you select:
- Inclusive matching: When you select multiple values for a single attribute, documents matching any of those values are shown (OR logic).
- Multiple attributes: When you apply filters on multiple attributes, documents must match all the selected attributes (AND logic between attributes).
- Real-time updates: Selected filters appear as badges/chips showing which values are active.
- URL-based state: Filters are stored in the URL, making filtered views shareable and bookmarkable.
Supported Attribute Types
The filter system supports multiple attribute types defined in your project setup:
List Attributes Single Select
Select one or more predefined options from a dropdown list (e.g., Document Type: Report, Drawing, Specification).
Multi-List Attributes Multi Select
Select multiple values with checkboxes from a list of options (e.g., Tags: Structural, MEP, Electrical).
Cascading List Attributes Dependent
Select from hierarchical options where child values depend on parent selections (e.g., Region → City → Office).
Text Attributes Text Search
Enter text to search for documents containing specific text values in text-based attributes.
Step-by-step: Apply Filters
- On the Documents page, locate and expand the Filters card.
- Each project attribute configured with "Use Field" enabled will appear as a filter control.
- For List/Multi-List attributes:
- Click the dropdown button for the attribute you want to filter by.
- Check one or more values from the dropdown (e.g., select "DMP - CR36" and "DMP - CR37").
- Selected values appear as badges in the "Selected filters" area at the top.
- For Cascading List attributes:
- First, select parent attribute values to populate child options.
- Then select the child values you want to filter by.
- Options automatically update based on parent selections.
- For Text attributes:
- Type your search text in the text input field.
- The filter will match documents containing that text in the attribute.
- Click the Apply Filters button to refresh the documents table with your filter criteria.
- The page will reload, showing only documents that match all your selected filters.
Managing Active Filters
Once filters are applied, you have several options to manage them:
- View active filters: Selected filters appear as colored badges in the "Selected filters" section, grouped by attribute.
- Remove a single value: Click the × button on any filter badge to remove just that value.
- Clear an entire attribute: Click the Clear button next to an attribute name to remove all values for that attribute.
- Reset all filters: Click the Reset button at the bottom of the Filters card to clear all applied filters and return to the unfiltered view.
Pagination & Sorting with Filters
Filters work seamlessly with pagination and sorting:
- Pagination: When filters are active, pagination controls show only the filtered results. Navigate between pages without losing your filter selection.
- Page size: Change the number of items per page (100, 200, 500, etc.) — filters remain applied.
- Sorting: Click column headers to sort the filtered results by that column. Filters and sort order both persist in the URL.
Technical Details
URL-based Filter State:
Filters are stored directly in the URL
- Benefits:
- Shareable: Copy the URL and share with team members — they'll see the same filtered view.
- Bookmarkable Save frequently used filter combinations as browser bookmarks.
- Browser history: Use back/forward buttons to navigate between different filter states.
Pro Tip: Save Filtered Views as Bookmarks
Common Scenarios
- Find all documents for a specific code: Filter by Document Code = "DMP - CR36".
- View documents from a specific discipline: Filter by Discipline = "Structural" or "MEP".
- Show documents from a specific phase: Filter by Phase = "Phase 2".
- Complex queries: Combine multiple filters based on your project's custom attributes (e.g., Code = "DMP - CR36", Discipline = "Structural", Region = "North America").
Screenshots

Common Issues & Troubleshooting
- No filter options appear
- What it means: The attribute may not have options configured by the Project Admin, or no documents have values for that attribute yet.
- What to do: Contact your Project Admin to configure attribute options in Project Setup > Attributes. For cascading filters, ensure parent values are selected first.
- Filter shows no results
- What it means: No documents match all the selected filter criteria.
- What to do: Try removing some filters to broaden your search. Check if the combination of filters is too restrictive.
- Cascading filter options don't update
- What it means: Parent selections may not have been applied yet, or there's a configuration issue.
- What to do: Click "Apply Filters" after selecting parent values, then select child values and apply again.
Best Practices
- Start broad, narrow down: Begin with one or two filters, then add more to refine your results.
- Request meaningful attribute names: If you're a Project Admin setting up projects, use clear attribute names so filters are easy to understand for all team members.
- Bookmark common views: Create clearly named browser bookmarks for frequently used filter combinations (e.g., "CR36 Documents", "Phase 2 Drawings").
- Share filtered views: Copy the URL and share with team members so everyone sees the same subset of documents.
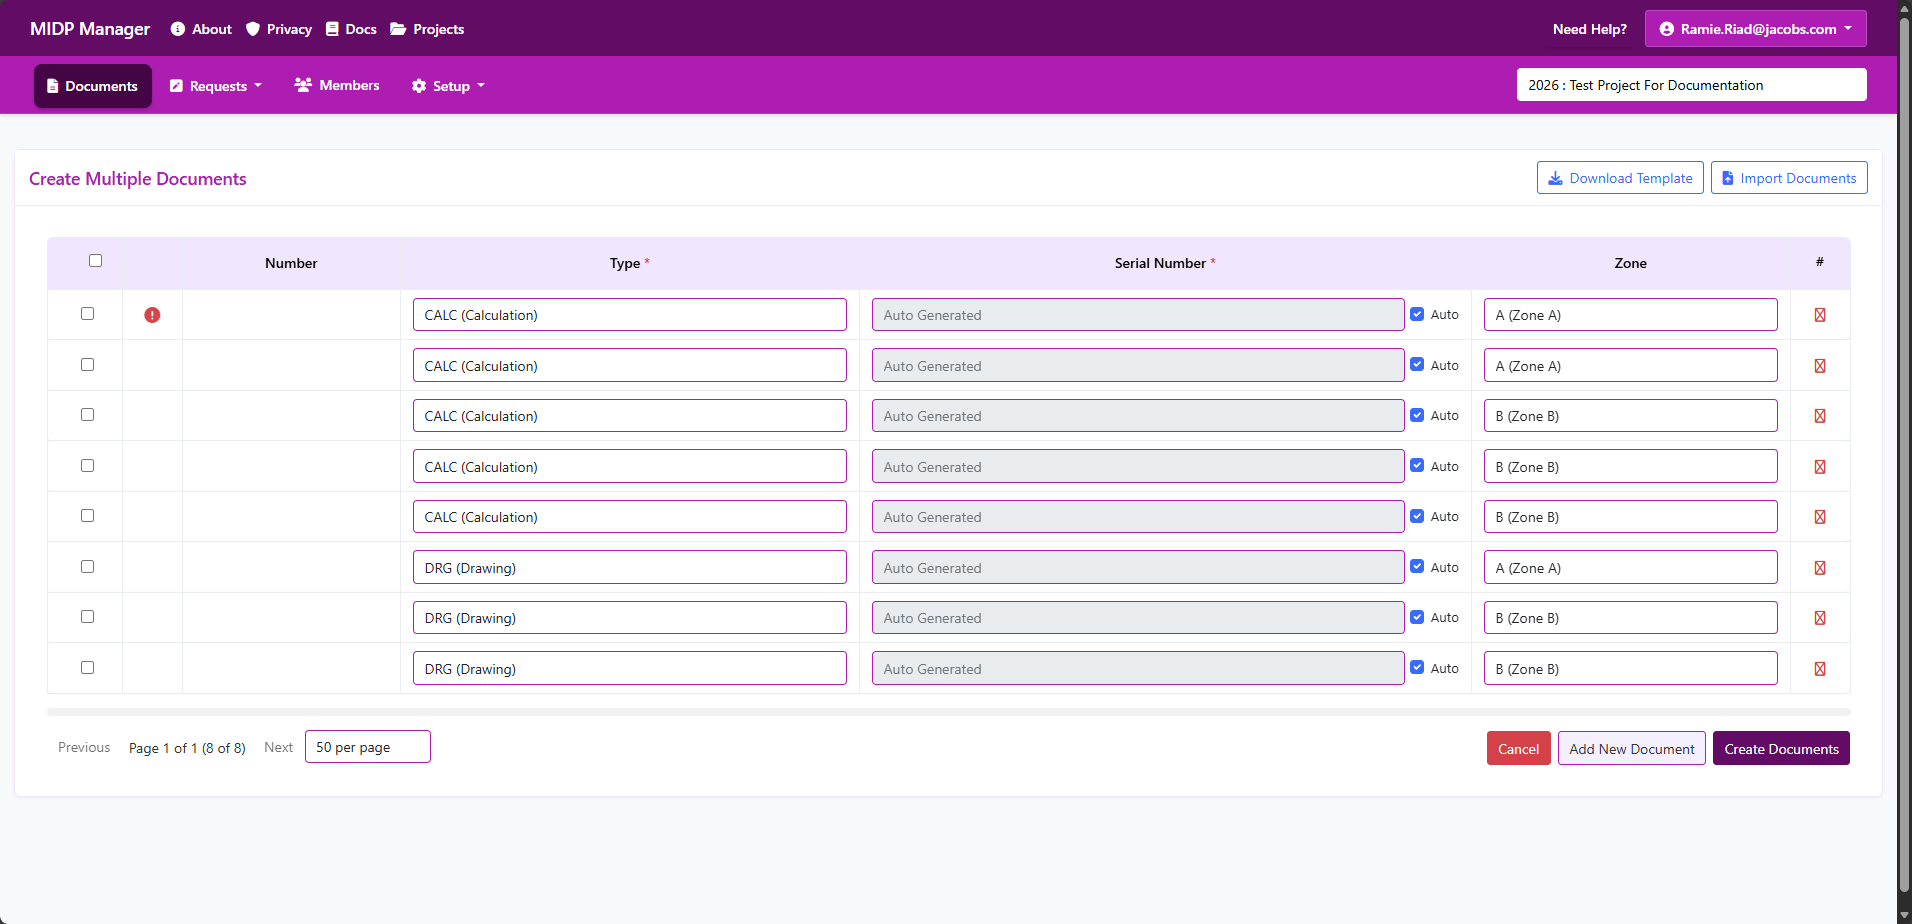
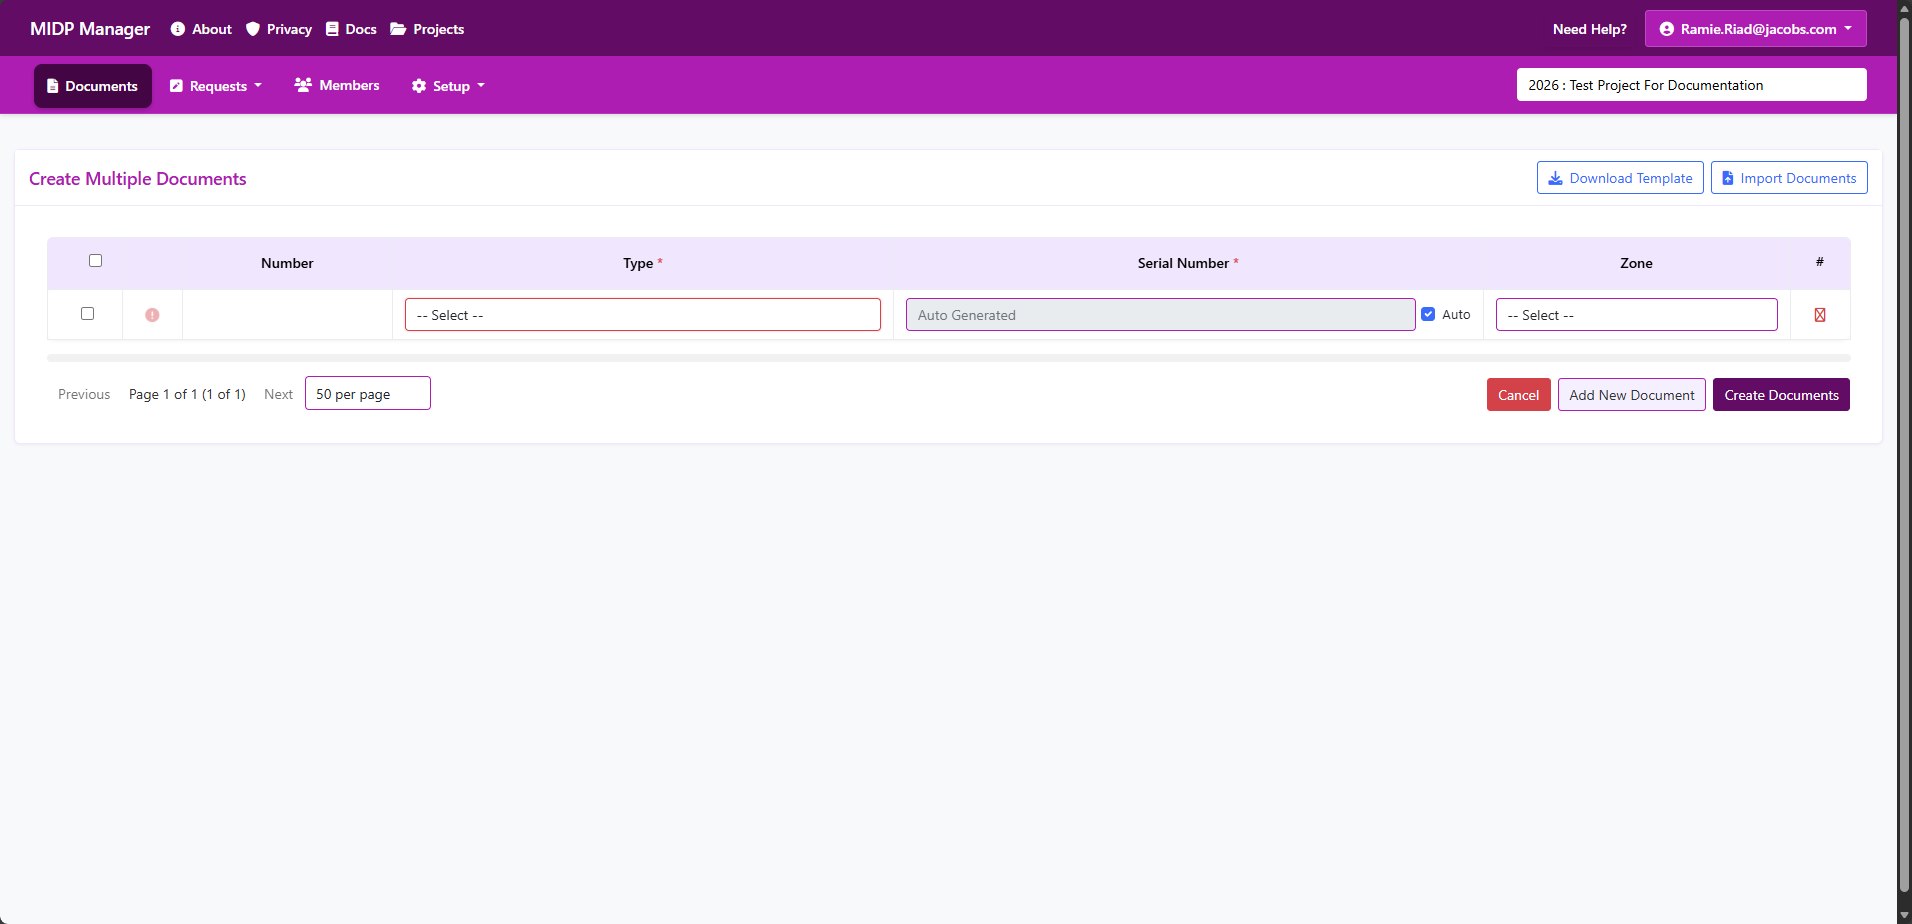
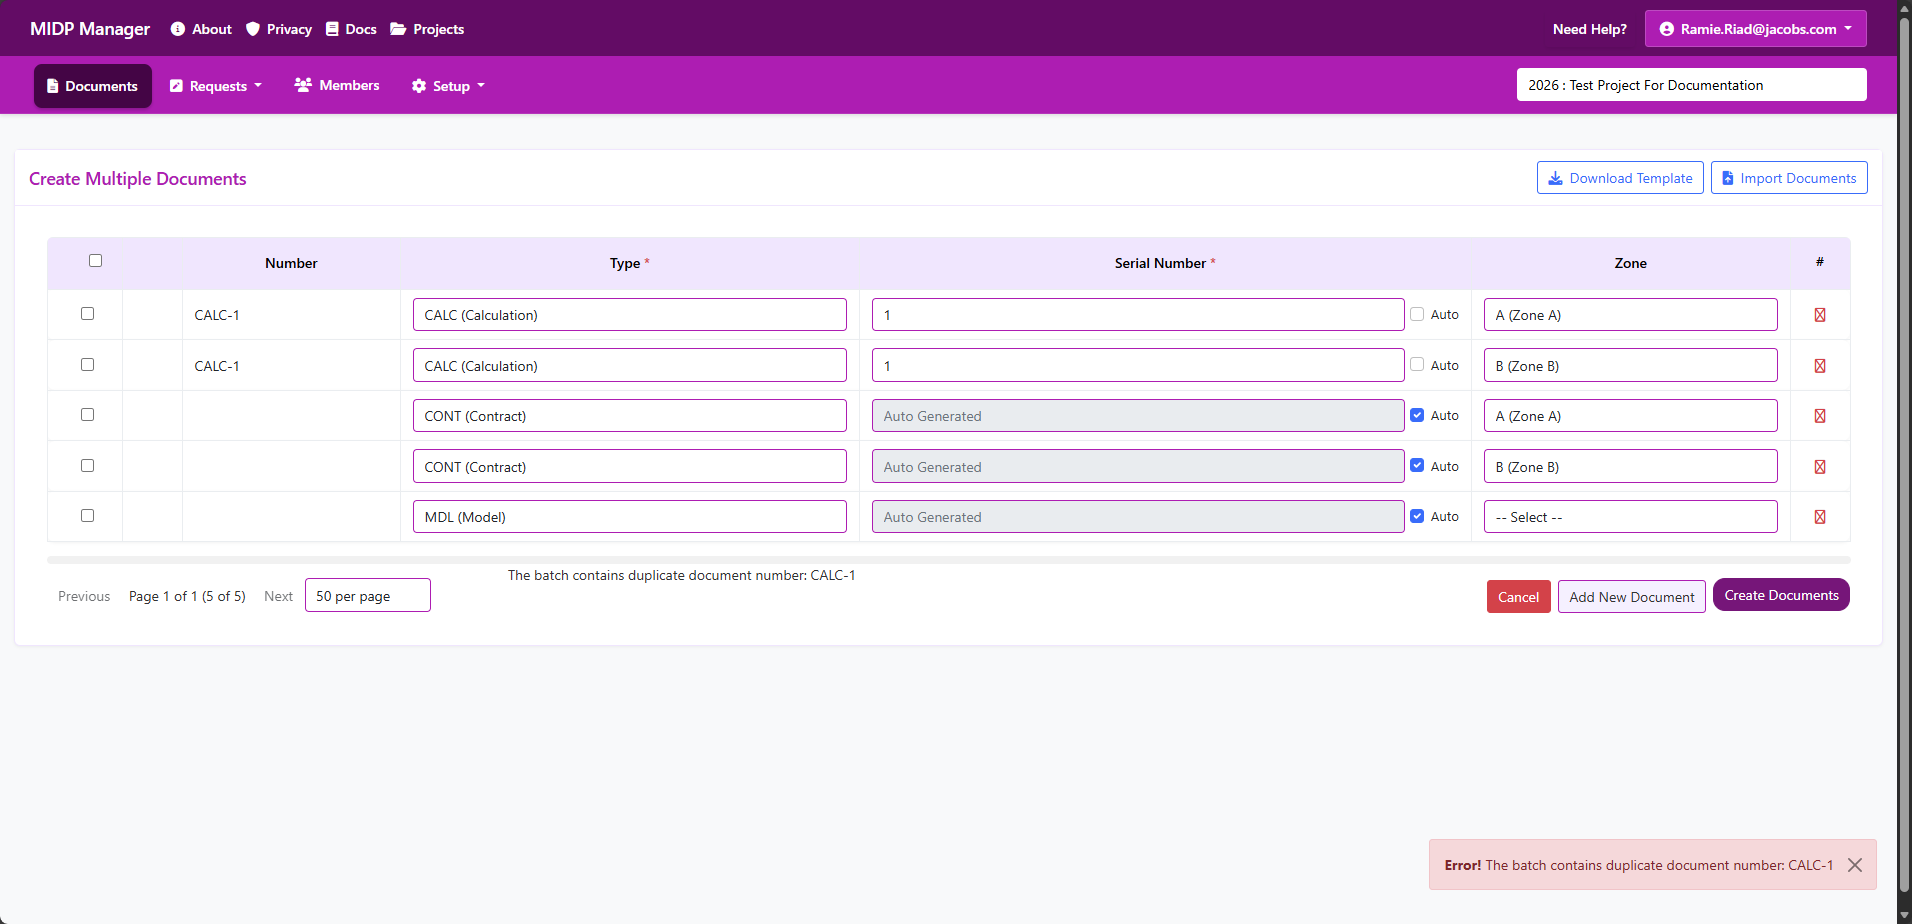
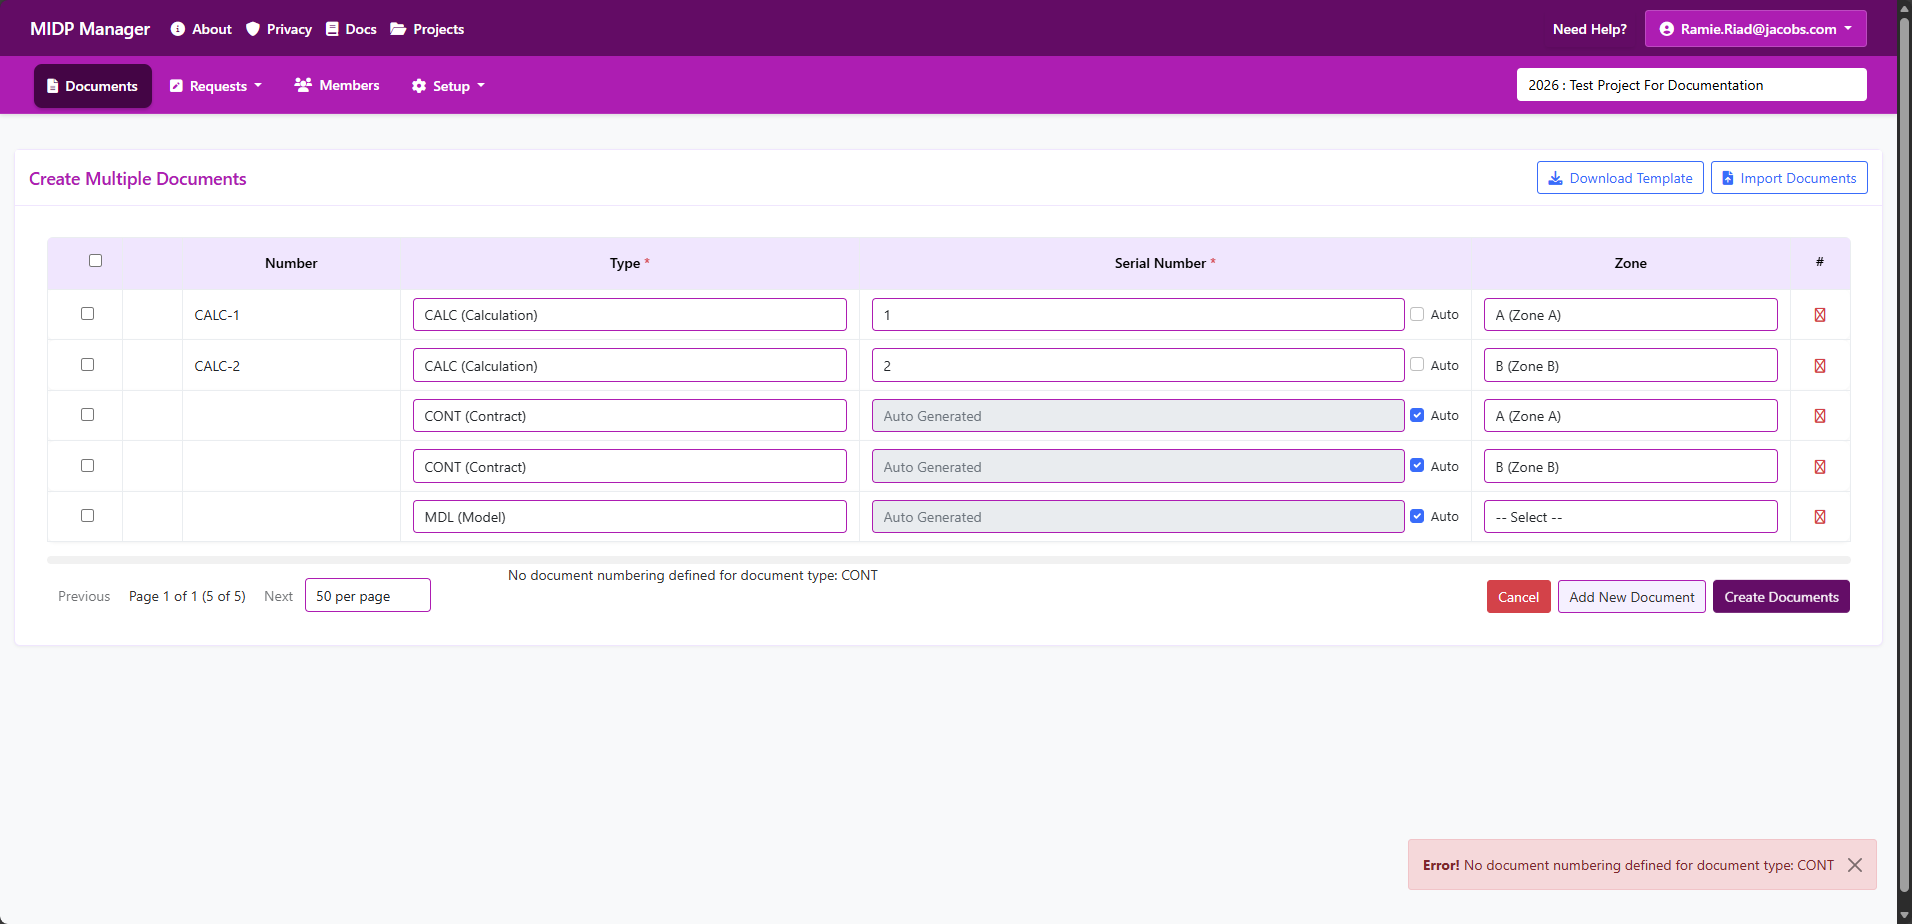
Batch create / modify documents
Purpose: Create or update many documents at once using the grid or the import template. This is the fastest way to add a large set of documents without repeating the single-item form.
Who can use this
- You must be signed in and meet site security requirements (for example, 2FA and a confirmed email) to perform batch operations.
- Your account must have the project permission that allows creating documents (ask a Project Admin if you're unsure).
- If you only have view-only rights you won't be able to submit a batch import; contact your Project Admin to get the required role.
Before you start
- Open the correct project — batch operations always run inside the current project context.
- Check Project > Setup > Attributes so you know which columns are required (attributes control the columns you will see in the grid or template).
- Decide whether you will enter rows directly in the grid or use the import template (Excel/CSV).
- If you use the template, download it first and do not change the column headers or order.
Quick steps (grid)
- Open the project and choose Documents > Batch Create / Modify.
- Use the grid to add or edit a row per document. Required columns are marked in the UI.
- Use the actions (add row / remove row) to adjust the number of documents.
- Click Validate (or the preview button) to check for errors before submitting.
- Fix any highlighted rows, then click Start batch create to submit.
- Review the progress and the final summary — a report will show which rows succeeded and which failed.
Quick steps (template)
- Click Download template and open the file in Excel.
- Fill each row according to the column headers; required columns are indicated in the template.
- Save the file as CSV or XLSX and upload it using Import.
- Validate the preview, correct any errors, then submit the import.
What happens when you submit
- The system first validates rows and checks for duplicates, open requests and other conflicts.
- Rows with problems will be reported back in the preview or result file so you can fix them and retry only the failed rows.
- Large imports are processed in batches; you will see a progress indicator while the server saves data.
- If your project requires approval, the import will create document requests that enter the project's approval workflow; otherwise documents will appear immediately.
- On completion you'll receive a summary showing how many rows were created, how many were queued for approval, or which rows failed with reasons.
Common problems & how to fix them
- Duplicate document number — remove or change duplicate numbers in your upload, or leave the serial blank to let the system generate it if auto-numbering is enabled.
- Open request blocking a number — check the project's Requests page for any pending requests that use the same number and resolve them first.
- Invalid or missing required columns — make sure you used the official import template and filled all required columns.
- File too large or wrong format — split large imports into smaller files and use CSV or XLSX formats.
- Partial success — download the result report, correct failed rows, and re-import only those rows.
Tips & best practices
- Start with a small test batch (2–10 rows) to confirm numbering and required attributes are correct for your project.
- If your project uses automatic numbering, leave the serial/number column blank to avoid conflicts.
- Keep batch sizes reasonable (we recommend splitting very large imports into multiple files).
- Keep a backup of your filled import template for audit and retry purposes.
Screenshots
Expected result: After a successful batch you will see a summary of created items. If the project requires approvals the items will be created as requests and appear in the Requests view until approved.
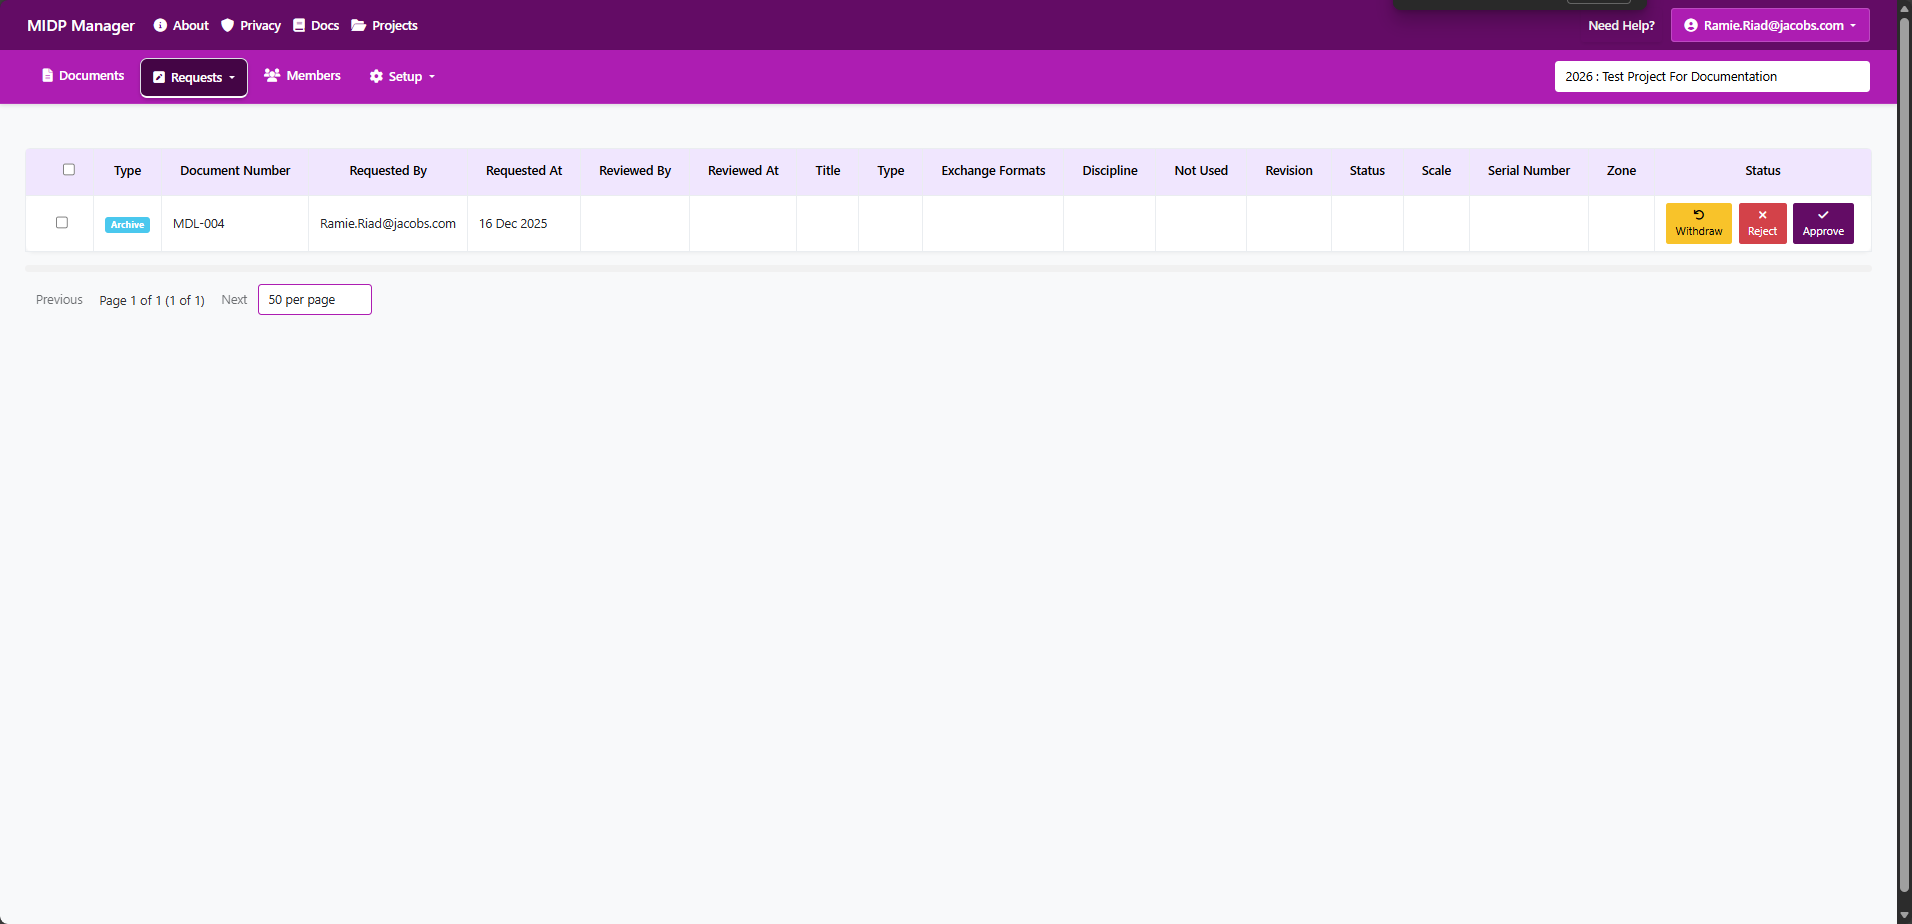
Archive documents
Purpose: Create an archive request to remove a document from the active documents list. Archiving is useful when a document is no longer current but needs to be kept in the system for record or compliance purposes.
Who can archive
- Contributors, Editors and Project Admins can create archive requests. If the Archive option is not visible, ask your Project Admin to grant you a suitable role.
- Project Admins and edits may need to approve or complete archive requests depending on your project's workflow settings.
Before you start
- Open the correct project — archive actions are applied to the currently selected project.
- Check whether the document has any open requests — requests can block archiving until they are resolved.
- Decide if you need to export or save any attachments or metadata outside the system before archiving.
- Archiving usually keeps the record but may affect visibility in the active lists.
Step-by-step (single document)
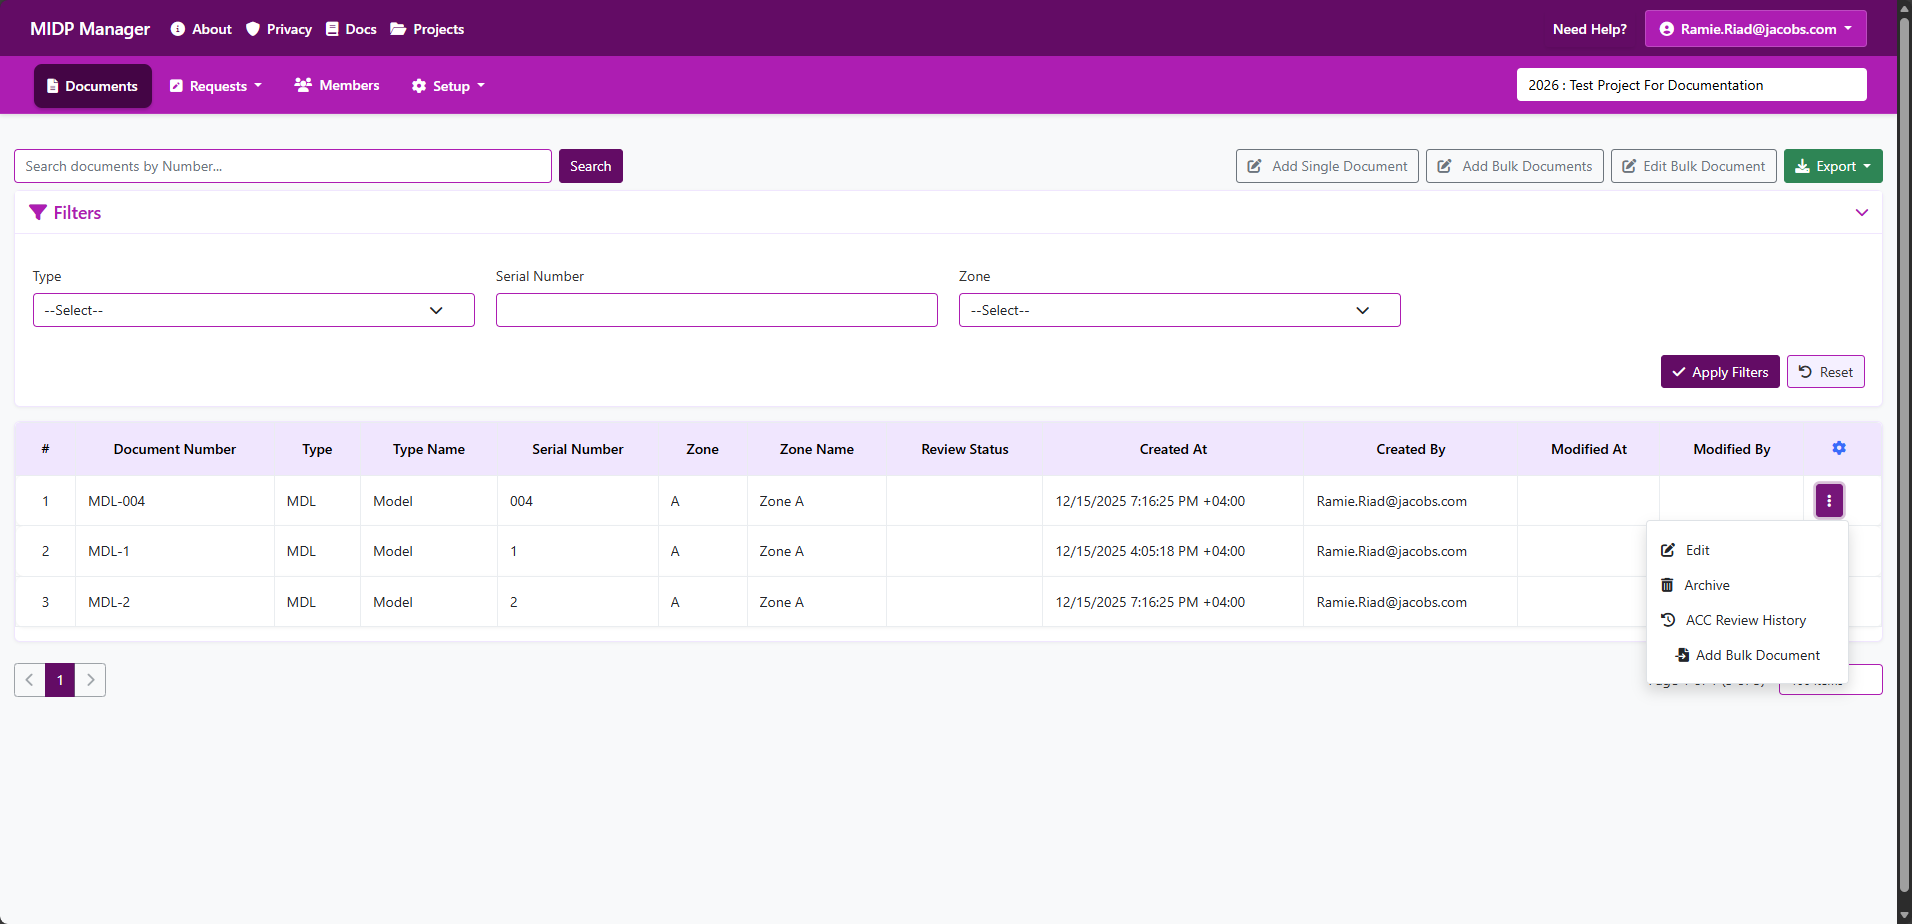
- Find the document in Documents list.
- Click the three dots (kebab menu) for the document and choose Archive
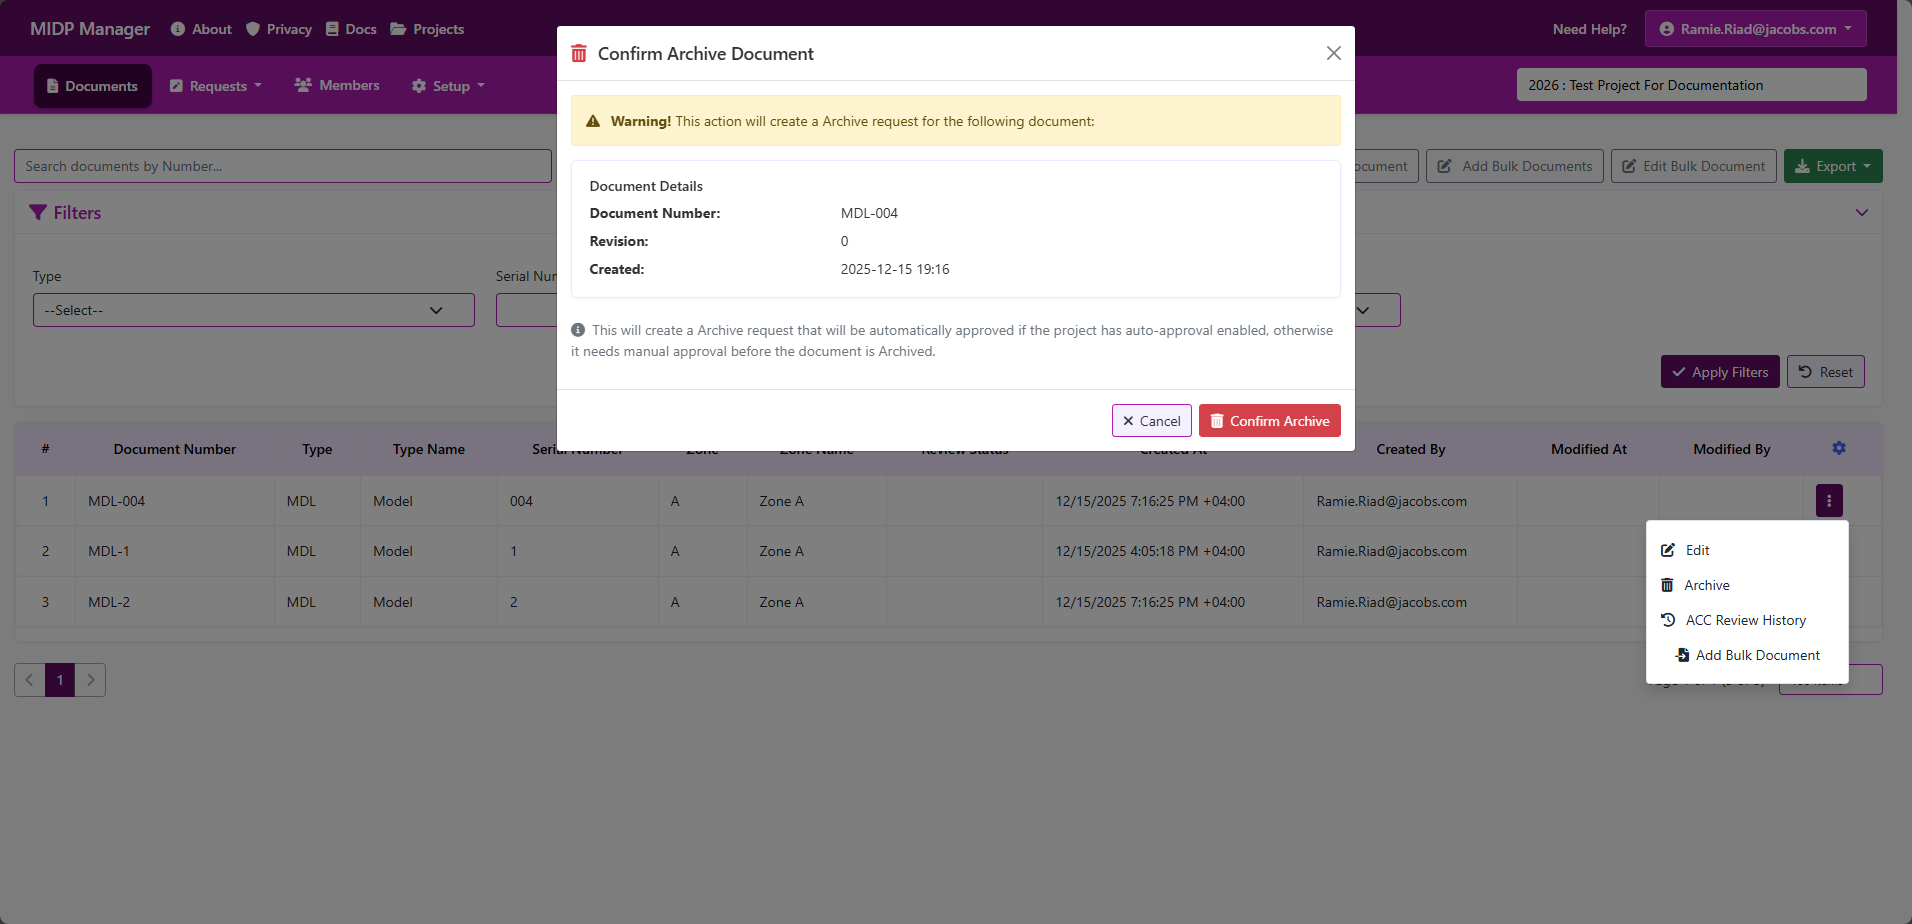
- In the Archive dialog, confirm the action
- Click Confirm Archive to create the archive request.
- You'll see a confirmation that the request was created. If your project uses approvals, the request will enter the approval workflow; otherwise it will complete immediately.
What happens after you archive
- Archiving creates a request that the system processes according to your project's workflow — this may require manual approval.
- While a document is archived (or pending archive), it may be hidden from the default Documents list
- Document Metadata is retained with the document record.
- If an archive request is rejected or rolled back, the document returns to the active list and its previous state.
Common problems & how to fix them
- Archive option not visible — you do not have the required permission; contact a Project Admin to change your role in the project.
- Cannot archive due to open requests — check the Requests page and resolve any pending requests for that document first.
Tips & best practices
- When archiving many documents, verify there are no open requests that would block the operation.
- If attachments must be preserved externally, download them before archiving.
Screenshots
Brief: The Document History view shows the recorded request/activity log for a document — e.g. metadata changes requested by users, approvals/rejections, archive/restore operations and any comments or attachments that were recorded as part of those requests.
Pre-requisites
- You must be signed in and have access to the project that contains the documents.
How Document History is produced (important)
History entries are produced by the application's Request workflow. When users create requests (Add / Modify / Archive), those requests and any recorded modifications become the items shown in the history table.
Example: if a user submits a Modify request that changes the "Discipline" attribute from "Architecture" to "Structural", that request will appear in history and list a modification row showing "Discipline: Architecture → Structural" together with who requested it and when.
Where to find Document History
- Open Projects > select the project that contains the document.
- Go to Requests menu.
- From the dropdown click the Requests History.
What you'll see in the History view
- Request Details: Each request may contain one or more modification rows. Typical action types: Add, Modify, Archive. Typical status types are: Approved, Rejected and none for withdrawn requests
-
Request Types include:
- Add
- Modify
- Archive
-
Status Types include:
- Approved
- Rejected
- None (For withdrawn requests)
- Pending Requests: Pending requests are shown in the Open Requests view only, and aren't shown in the history unless they are approved, rejected or withdrawn
- Who and when: The user who created the request (Requested by) and the timestamps are shown. If an action was approved/rejected, the Reviewed By and Reviewed Time are displayed.
- Modification details: For Modify-type requests, the history shows attribute-level changes (old value → new value).
- Sorting & paging: Entries are typically shown newest-first and are paged when the history is long.
Note about pending vs processed requests
The intended behaviour is to surface processed requests (approved/rejected/archived/Withdrawn actions) in the history.
Step-by-step: Inspect a document's history
- Open the document's row and click History.
- The history page opens showing the most recent request/activity at the top.
- Use pagination controls to browse older entries if the document has a long history.
Expected result
After opening History you should see a chronological (newest-first) list of recorded requests and their modifications. Each entry shows the change, who requested it, and any approval/rejection details if the request was processed.
Screenshots
Add screenshots to the folder /docs/images/Documentation/DocumentHistory/. Suggested images:
HistoryList.png— the history list showing multiple entriesHistoryRowDetail.png— expanded row showing comments and attachmentsHistoryPagination.png— example of pagination controls (if applicable)

Common issues & fixes
- No history visible
- What it means: The document may not have any recorded requests yet (for example it was just created), or you may not have permissions to view history details.
- What to do: Confirm prior activity exists. If you expect history but see nothing, contact your Project Admin to check your project role and the request log.
- Pending request appears in history
- What it means: A request was created but not yet processed (approved/rejected). Pending entries can appear in the list depending on server behaviour.
- What to do: If you expect pending requests to be hidden, contact your Project Admin or open an issue so the team can update the History view to exclude pending requests.
- Missing comments or attachments
- What it means: The original request did not include comments/attachments, or they were removed after creation.
- What to do: Check with the user who raised the request or the Project Admin to confirm whether the data was recorded.
Best practices
- Use clear comments: When creating or approving requests, add concise comments so future reviewers understand the reason behind changes.
- Attach supporting files: Where useful, attach screenshots or documents to requests to provide context for reviewers.
- Confirm roles: If you need detailed audit information, ask a Project Admin to confirm you have the appropriate project role to view full history entries.
- Report inaccuracies: If the history shows unexpected pending entries or missing actions, report the issue so the team can investigate the server-side behaviour.